 Silkscreening is such a great happy medium — nestled comfortably half-way between hand-drawn and mass production, more colourful than photocopying and with an aesthetic all its own. Artist Shannon Gerard broke out her silkscreening gear to make cool shirts and posters for her upcoming comic launch, and despite being crazy busy has shared her skills in this funny and detailed tutorial. Read on to learn how to print your own posters, shirts, or whatever you fancy printing on, and how the Virgin Mary and Spiderman join forces to help her out.
Home Screenprinting Tutorial
by Shannon Gerard
1. Choosing and Preparing Your Screen
What you need:
~ A screen with the right mesh count for your printing surface
~ Mr. Clean or any water based degreasing agent
The first thing you need when setting up a home print shop is the screen (I know, weird). Screens with aluminium frames last much longer than wooden frames which warp after repeated washings. Aluminium screens are usually only 10 dollars more than wooden screens of the same size, so even if you plan to use your screen more than one time, the extra money is definitely worthwhile. A sturdy aluminium screen will continue to lie flat on the printing surface after multiple uses and the mesh is pulled much tighter around an aluminium frame which produces a crisper printed image. They’re also a lot easier to wash out than wooden screens.
The other major factor to consider is mesh count. The mesh count refers the tightness of the weave in the mesh fabric of the screen. A higher mesh count means the fibres of the mesh are closer together and a lower count means the fibres are more loosely woven, so more ink can pass through the screen. If you are printing on paper, you want a screen with a mesh count of about 230 for really optimal results. A screen that tight will allow you to print images with finer details and thinner lines. Since fabric is generally more absorbent than paper, you need a screen that lets through more ink when printing on t-shirts, totebags, or anything cloth. For fabric printing, you should use a screen with a mesh count of 110 or 160 (those tend to be the standard counts sold). I use 110. A lot of folks also opt for a mesh count of about 180, which allows printing on both paper and fabric, but there is an obvious loss of fine detail if you print onto paper at that count.
If you live in Toronto, the best place to buy screens and related materials (it’s the cheapest too), is G&S Dye and Accessories at Dundas and University. Dixon, who runs G&S, knows everything about fabric printing (I almost believe he could bring about world peace) and is also very helpful about supplies and advice. His website has very detailed information about printing including some in-depth tutorials and awesome diagrams of home set-ups.
Once you have bought your screen, the first important thing to do is wash it out with cold water and a degreasing agent (I use the unfortunately gender-specific Mr. Clean, the concentration a little bit weaker than what you would put on the
floor). Getting any grease out helps the emulsion to bond with the fabric which gives you a crisper stencil.
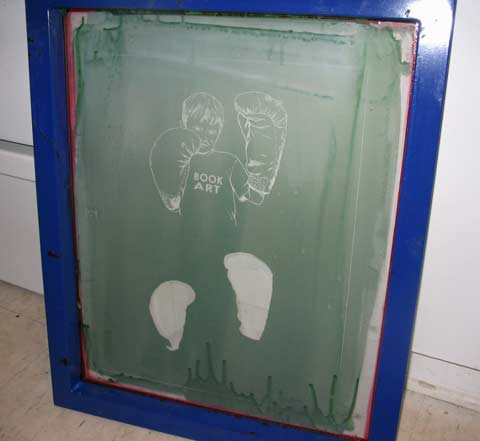
Also important is to understand the orientation of your screen (not the gender specific kind). The flat “back” of the screen which sits on the printing surface is called the “print side” or “paper side” and the “front” of the screen, recessed inside the lip of the frame, is called the “squeegee side.”
|
||||
|---|---|---|---|---|
| 2. Preparing Your Artwork
What you need: ~ Original artwork with a high contrast ~ Transparency film Screen printing is a very “flat” medium, so images that are starkly contrasted work best. When preparing your artwork to be burned to the screen (to create the stencil), work in black and white only — grey tones and the subtleties of photographic images will not produce a workable stencil. If you start with a photo, as in the example below, reduce the information to a line drawing, or apply a filter or halftone screen in Photoshop which will reduce the image to a series of dots. |
||||
|
||||
| I used the photo on the left as a source to produce the drawing on the right, but I liked the red colour of the boxing gloves and wanted to include that in the final print. You can print in any colour you want, but the artwork used to make the stencil must be black. I coloured in the glove shapes, making sure they remained registered correctly to the drawing: | ||||
 |
||||
| Every colour you want to print requires a separate stencil.
Once you have the artwork prepared, print or photocopy it onto transparent film, and you will be ready to produce the screen stencil. It is very important that the black areas printed on the transparency are completely opaque, so hold it up to the light and make sure all the black lines are totally dense. 3. Burning the Stencil What you need: ~ The screen ~ Emulsion and sensitiser ~ A scoop coater or squeegee ~ Rubber gloves ~ A rubber spatula ~ A darkroom and photosafe light ~ Black bristol board, or black cloth or felt ~ Transparencies containing your artwork ~ A sheet of glass ~ A light fixture with a 250 watt photo flood bulb ~ A timer ~ A spray bottle full of cold water ~ A shower head, spray nozzle or garden hose This is the most intensive step in the screenprinting process, but if you take a little extra care when making the stencil, the printing process will go super fast. The first thing to do, after your screen is degreased and completely dry, is to coat the screen in emulsion. Emulsion is the photosensitive goop that will make the stencil on the screen. In areas where the emulsion hardens, the screen is blocked so no ink can pass through. In areas where the emulsion is kept soft and eventually washed out of the screen, the ink will pass through to produce your print. Emulsion is hardened by exposure to light, so you need to conduct this entire process in a darkroom using photosafe lights to see by. I use the extremely ghetto mechanism of a Blessed Virgin Mary (BVM) night light with a red christmas tree bulb inside (witness the shame below) and coat my screens in our windowless bathroom (it gets worse). |
||||
 |
||||
| Emulsion comes in two parts, the emulsion proper and a small bottle of sensitiser. Working by the red light of your own BVM, mix the emulsion with the sensitiser (each brand comes with its own set of instructions on the label). Once sensitised, emulsion is good for about 3 weeks at room temperature, or about 3 months (tops — it gets iffy at the end of those 3 months) if refrigerated. Always wear gloves! when handling emulsion. Those photo-chemicals are nasty!
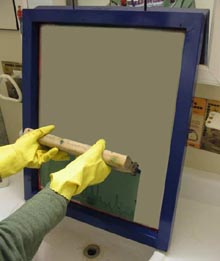
To coat the screen, you can invest in a scoop coater (about 14 bucks) or can use the slightly grosser and less controllable option of a squeegee or wallpaper smoother. A scoop coater is a very easy-to-use trough which holds the emulsion and deposits a nice even, thin coat on the screen. If you’re using the squeegee or smoother option, use a spatula to spread a line of emulsion along one end of the screen (See below) and then, pressing very firmly with the squeegee, drag the line of emulsion down or up the screen until it is evenly coated with emulsion. It is very important to have a thin, even coat of emulsion on the screen, uninterrupted by drips or blobby areas that could mess up the clarity of your stencil. I always double coat my screen by applying one coat to the paper side and another to the squeegee side. You must double coat all in one go while the first coat is still freshly wet. |
||||
|
||||
| Leave the coated screen in the dark to dry for at least 2 hours. Some tutorials say one hour, but I always have bad results with that timeline because the emulsion is not ready. The important thing is that the emulsion is completely dry before you expose your image. No stickiness allowed.
Once the coated screen is dry, you can expose it. It is easy to set up a home exposure unit by arranging materials in this order (from bottom to top)– 1. black cloth or board on the bottom to absorb the light and prevent it from bouncing back through your image area; 2. screen next with paper side down (against the black board); 3. transparencies against the squeegee side of the screen, oriented so that you can read them normally from left to right; 4. a sheet of heavy glass on top of the transparencies to hold them down as tightly as possible to the screen surface; 5. a lamp situated about 1 or 1.5 feet above the glass top with a 250 watt photo flood bulb installed (any good photo store has these for about 8 bucks a bulb). |
||||
 |
||||
| Don’t forget to set up this exposure unit inside the darkroom! Also, make sure there are no obvious dust particles or other matter in between the transparency and the screen or the glass and the transparency. Any material that blocks the light from getting to the emulsion will show up in your stencil and will interrupt your print.
The other big thing to keep in mind here is that the outer two inches of the screen area (closest to the frame on all sides) are unprintable. Because the tension is so high where the fabric is stretched around the frame, you can’t get a good print out of the border areas of the screen. Make sure your image does not go closer to the frame than 2 inches all around. Once you have the unit set up in the dark, turn on the flood light for about 15 minutes and allow the emulsion to harden in areas that receive the light. At the end of 15 minutes, you can turn off the flood light and work in the regular light of the room (no more darkroom necessary). Remove the glass and transparency (you will probably be able to see a ghost image of your design at this point, but if you don’t — it’s okay) and immediately, thoroughly spray the entire surface of the screen with cold water. You have to do this right away and wash the screen out before the emulsion gets hard where your design is. Use a spray nozzle in your shower (how convenient that my exposure unit is in the bathroom) or sink, or use the garden hose to spray down the the screen. Gently pass the spray across the whole surface of the screen until your design is completely washed out. Hold it up to the light to make sure no cloudy areas remain inside your stencil. If any pinholes show where you don’t want them, paint them in with left over emulsion and leave them to dry in the sunlight. Now your stencil is done! Let the screen completely dry before printing. |
||||
 |
||||
| 4. Printing the Image
What you need: ~ One set of two hinge clamps ~ A large flat surface ~ A big sheet of acetate (at least 2 feet square) ~ The finished stencil on the screen ~ Packing tape ~ A rubber spatula ~ Appropriate ink for your printing surface ~ The right squeegee for your printing surface ~ Whatever you plan to print on (t-shirts or paper) ~ A hot iron To set up for printing, you need a completely flat table or counter top with two hinge clamps installed at the far side and a large piece of acetate or velum (at least 2 feet long — much larger than the paper or fabric you are printing onto). Tape the acetate down firmly at one end so that it will not budge. You need it to be perfectly fixed at one end in order to properly register your print. |
||||
|
||||
| Fasten the screen into the hinge clamps with the squeegee side facing up and make sure you can move the screen into an upright position in the clamps without it falling back down to the printing surface. | ||||
|
||||
| Use packing tape to block off any open areas of the screen that you don’t want to print. | ||||
 |
||||
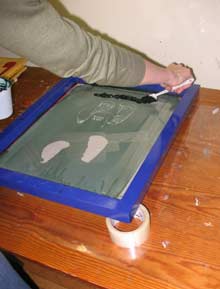
| Prop the screen up slightly with your roll of tape and apply a line of ink onto the surface of the screen about 2 inches above the image to be printed. Flood the image with ink using your squeegee. Make sure you have the right kind of squeegee for the material (paper or fabric) on which you are printing. If printing on fabric, make sure you use fabric ink, otherwise your image will wash off in the laundry. | ||||
|
||||
| Make sure the acetate is between the printing table and the screen. Lower the screen to the table surface and print the first copy of the image onto the acetate. Immediately flood the image with ink to keep it from drying out. Raise the screen to an upright position in the hinges. | ||||
 |
||||
| Use the acetate to register your image in the right spot on your shirt or paper by orienting your shirt or paper underneath the acetate. | ||||
 |
||||
| Remove the acetate (just move it out of the way, don’t detach it from the table!) and lower the screen onto your shirt or paper. Print the image by holding the squeegee at about 45 degrees and applying even, strong pressure to pass the ink through the screen. | ||||
 |
||||
| Ta da! | ||||
 |
||||
| Remember that this ink dries to plastic. Any area, however small, where it dries in the screen will become unusable in the future. In between each print, flood your image. When you’re done printing, wash the screen of all ink right away. Mr. Clean (or any non-gender specific water based cleaning agent) can be used to wash out ink (if necessary) without degrading the emulsion.
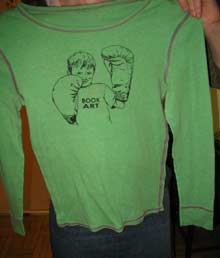
Screen ink dries very quickly, so if you are printing in many layers on paper, you can print the second layer on top of the first within about 20 minutes (I wait longer just to make sure no colours bleed together, but you can do it in 20 no problem). If you are printing on fabric, let the image dry for at least an hour (I wait 2) and then iron over top of the image on the hottest setting for at least 1 full minute. Ironing the ink makes it colour fast in the wash. Easy huh? Here’s what the printed shirt looks like, and here’s what the same image looks like, in two layers, on paper: |
||||
|
||||
|
~~~ Thanks again to Shannon for writing this amazing tutorial — check out her art on shannongerard.org. |


418 responses to “How to Silkscreen Posters and Shirts”
HOW TO – Silkscreen posters and shirts…
Shannon writes – “Silkscreening is such a great happy medium — nestled comfortably half-way between hand-drawn and mass production, more colourful than photocopying and with an aesthetic all its own. Artist Shannon Gerard broke out her silkscreening…
What a fantastic run down of the process!! Great tutorial! The eeriest thing about it all though is that I use almost an IDENTICAL nightlight in my bathroom when dealing with the emulsion! Mine isn’t La Virgin though, it’s the man JC himself holding a darling little lamb.
Great work!
Screen Printing…
Ever wondered how Warhol produced his legendary paintings?
Here’s a selection of sites explaining how to do screen printing:
“Silkscreening is such a great happy medium — nestled comfortably half-way between hand-drawn and mass producti…
Thanks for putting up a great page. Much better than other DIY posting which don’t really discuss thread count and proper techniques. I wasted time and money following not the greatest advice. It toook a while to figure all this stuff out. Anyways, great page!
i’ve been wanting to figure out how to do this for years, my gratitude to you knows no bounds…
This is such a great tutorial. Really cool.
I really appreciate your page on silk screening. Thanks, fran miller, denver
[…] How to Silkscreen Posters and Shirts This is a nice little tutorial. I’ve been meaning to learn how to silkscreen for like ever. (del.icio.us tags: DIY design clothing art useful) […]
A better tutorial on silkscreening, in my opinion:
http://www.stencilinternational.com/tutorial_basic_silkscreening.php
and how to build your own silkscreening press:
http://www.stencilinternational.com/tutorial_build_press.php
[…] I’m always impressed when somebody can get something down to the level where even I can stroke my chin and muse, “Hey, I could do that.” Next thing I know there’s another todo on my list and I’m doomed. This is the trap I encountered over at the most excellent No Media Kings, where they present a tutorial on how to screenprint your own shirts, crafted by artist Shannon Gerard. Bonus points for working in Spidey and the Virgin Mary, something we haven’t seen since that Marvel Team-Up special. You know the one. […]
Um, I wonder what you’re basing that on Drew, other than the fact that you wrote it? I took a quick look at your links and they do have more gratuitious use of the hiLARious hip slang “Bitches!” and a lot of pictures of you with powertools, so I guess you win.
what is the point of the acetate step?
who coats a screen with the squeegie? try using a scoop coater next time it will work much better and cut your dry time to about 30-40 min. using a fan. good luck
[…] i’m going to build a screenprinting press so i can create beautiful t-shirts like the ones on threadless except with less colours and junk. I’ll probably follow the guide from http://www.nomediakings.org/doityourself/howto_silkscreen_posters_and_shirts.html. […]
I have been wanting to learn this process for years. Thank you very much!
Silkscreen your own posters and t-shirts…
The No Media Kings blog has a nice tutorial for screenprinting your own shirts and posters from photographs. If you’ve ever considered leaving behind the world of pre-designed clothing for something that really speaks to your aesthetic, learning to…..
[…] http://www.NoMediaKings.org – Step-by-step instructions with lots of pictures […]
[…] How to Silkscreen Posters and Shirts – Time to silkscreen some orange shirts, I’d say. [via Lifehacker] […]
[…] No Media Kings has a primer. […]
[…] No Media Kings: I know that printing up your own hoodies might seem like a risky venture, but it can’t hurt to be creative, and we’ve all been sat in a bar going “dude, we should totally put that on t-shirt” (only to forget the idea the next day). But the screenprinting tutorial over at No Media Kings is one of the best I’ve read, and whilst I’ve never tried printing myself, it does look like it might be fun. […]
Love what you are doing. Thought you might be interested in my site – I provide free patterns for people to make their own clothes. I currently have one pattern for guys (a hoodie) but plan to have more as there are obviously a few guys out there giving it a go.
Something crucial she does not mention is when screening to a dark medium, use a white layer as a base/outline layer so the bright colors continue to “pop”. To do this, combine all your stencils into one and make thtat the white layer.
[…] It’s Thursday; you’ve decided to ditch your olde-timey folk band & start hand-rolling your own line of couture clothing. You better learn how to silkscreen. © 1996 – 2005, Hanttula.com Copyright & Credits […]
[…] What a great tutorial on No Media Kings about How to Silkscreen Posters and Shirts! It makes me want to set up a silk screen studio. But then I remember twenty five years ago when I went to Simon’s Rock and took a silk screening class and Bob Anderson came out so we could do posters for his band Special Guest and then Bob acciedentially got emulsifier on his leg and it started to eat through his pants as we were walking in the freezing cold weather from the studio back to the Crosby dorm so he could shower to get the emulsifier off his leg and I was laughing and laughing because he was hobbling along in such pain. I’m laughing now thinking about it, too. […]
I have been searching for a good tutorial on how do do this for a while now and this is by far the best. I started screen printing about a week ago so I am pretty new at this still. You have pointed out details that no one else has even bothered to mention. It’s 1:40 in the morning and I am inspired!
[…] Once I do have my own process worked out, I will post it. But until then, here are some great resources to get you started. No Media Kings has a in-depth tutorial on silk-screening in general (for tshirts or posters or whatever). They go over a two-color example. Angry Chicken has an innovative stencil process involving ironing freezer-paper. This is a way simpler process than a photo-emulsion process. Using cheap freezer paper is a great way to avoid buying expensive made-for-tshirt-making kits. Craftgrrl has a great alternative process involving glue and an embroidery hoop. She also gives a great HowTo on using MS Paint to create an image – as opposed to using more complex image editing tools. And finally: Stencil Revolution has many articles about stenciling in general. They do have two specific tshirt-printing HowTos, both involving a easy low-tech acetate stencil. […]
You have the most concise and helpful screening tutorial I’ve run across anywhere…period. Most sites try to make the process look like magic. Your sly sense of humor and straighforward approach make it much less intimidating for a beginning screener. Cheers!
thanks for that! i really needed to know how to silkscreen print for a school artowrk project i am working on, i visited lots of websites which were not as good as yours. it really helped, anyway, thatnks again, Laura
So emulsion is only good for 3 weeks? What happens after that?
If you refrigerate the emulsion, it will last about 2.5 to 3 months. If not, about 3 or 4 weeks is tops. After the emulsion “expires” it won’t harden properly when you expose it, so lots of things can go wrong with the stencil. Big chunks can peel off, the whole thing might wash out, the background emulsion will break down, you name it.
Thanks for the great tutorial! I just saw a great Warhol exhibit at the allentown art musuem and was totally inspired. I’m a graphic designer pretty much reliant on my mac but I’ve been anxious to get my hands dirty. Thanks!
Every time I try to make a print, the ink gets clogged in the screen and doesn’t pass onto the paper. Do you have any idea why or how I can fix this? I’m using speedball ink and screens.
There’s a new member-supported silk screening studio opening up in Toronto: http://www.popfuel.com/
GREAT ! THANK YOU A LOT FOR THE BRIGHT DESCRIPTION .
Bill,
Speedball is a very unreliable company who make students grade inks and products. From batch to batch, they are very inconsistent, so you never know what you’ll get. Unfortunately, they hold the monopoly in most run-of-the-mill art supply stores, but it you can avoid them DO IT!
What city do you live in? If you’re in TO, check out G&S Dyes and Accessories. I use their transparent base and pigments to print onto paper and fabric. They have way better colours and comparable prices. They also sell pre-mixed opaque inks but they are very thick so you have to add a bit of transparent base anyway.
As to why the ink won’t pass through, you have to consider the relationship of all materials to one another, so there are lots of factors to check:
What is the mesh count of your screen? Get the right count for the surface you are printing to.
Is the emulsion fully rinsed out of the stencil? Hold it up to the light and make sure the stencil areas are not at all cloudy and that light passes all the way through.
Are you using the right kind of ink for the surface you’re printing to? There is a different kind of wash-safe ink for fabric and two kinds of acrylic inks for paper, one that will smudge if it gets wet and another that dries for good.
Are you using the right kind of squeegee for the surface you’re printing to? A stiffer, less malleable squeegee is made for paper prints and another squishier kind is for fabric.
Are you holding the squeegee at a 45 degree angle when you print and pressing hard enough? (You have to press kinda hard, you’ll figure it out for your own body after a few tries)
Are you flooding the screen between prints? This part is really important because screen ink dries very quickly. You have to keep those stencil areas really well lubricated between each print so that the ink doesn’t dry. If the ink dries too fast for you, try adding ink retarder to slow the drying time.
I hope some of that long-winded stuff helps.
[…] Have found a number of useful tutorials on the web, how to silkscreen posters and shirts on new media kings is good and there are a couple of useful posts on stencil international (just ignore the try hard gangsta language). […]
I am just starting out and trying to learn to print t-shirts. Your tutorial has been a great help. My problem seems to be finding the right mesh size for fabric. My design is not real detailed. I am having a lot of trouble finding this information. Currently I tried to use what they call 8xx and 12xx … sometimes too much ink comes through. I am not sure what the difference between the xx’s and the 110’s.
Thanks for a great tutorial with great pictures.
Very nice and simple of way of teaching the otherwise complecated process.
In the same way will you please tell me ” How Rubber printing is done on T-Shirts is done. Rubber printing meaning a Leaf kind of Printing that is what I can say. I do not know the tech.name of the process. If we move hand over the printed area we feel it as if it is quoted by rubber or something like that. I will be thak ful to you if you send me the answer on my mail i.d. directly.
Thanks!
Vilas
(India)
Anyone out there have suggestions for good place to get blank t-shirts if you’re not going to buy in bulk?
Thanks
Arts and crafts stores are usually a good choice.
[…] While going through my rss feeds I found this link to some really cool silkscreen ties, here is their flickr account with some more picutes. Granted I never dress up, but can you imagine how great it would be to show up to a job interview with one of these bad boys on. I plan, in the near future to make a page with all the rss feed that I read every day. In the mean time I found the ties on Make: blog which is a really good blog if you like making strange computer related projects. Also here is a link form Make: blog which is a good how-to silkscreen shirts and posters, which I plan on trying when I get some time. […]
[…] http://nomediakings.org/doityourself/howto_silkscreen_posters_and_shirts.html […]
If you want blank shirts I suggest American Apparel. They are sweatshop-free, and come in tons of different cuts and colors!
Thanks so much for making a great tutorial – recently I’ve been making a bunch of ties and have a new intern coming in next week to help out in the studio. I will definitely be sending her this primer before we get started.
-Bethany
thanks,
so crazy i found this link on one good bumble bee , from some state that is warm, so fun and funny to find local talent in places i didn’t expect, like traveling full circle.
i continue to love my t shirt shannon,
thanx for the tutorial….
i must silk screen!
cheers kim
At last, you have no ideia the amount of time i`ve wasted looking for a screen print tutorial like this one. Muito Obrigado ( thanks in portuguese)
after reading a bunch of tutorials, this one is the most clear and concise that i came across, with everything combined, to setting up a basic studio,
thanks for the info. Has saved me a lot of time and money. cheers
Dear readres
I am an amatuer watercolorist,i found and love this site of silk screen printing this is indeed very informative,teachyourself step by step site,my congratulation to author of the site.
If i get time i will teach my kids,how to apply photo emulsion,how to expose,how to correct stencil,how to remove pigment as well as emulsion,really no light or heavy machinery is required for printing,one of my friend created very clear seals/logos on a very glossy golden sheet of sticker.
keep on adding,good luck.
Naseem ahmed khan
www,addpk.com
I just completed my first printing on a t-shirt using these instructions. I can’t say it was painless; the end result was perfect in spots, not so perfect in others and I made a hell of a mess, I ended up printing on the shirt I was in at the time because it was totally shot by the end. All said and done I must say thanks. A very helpful tutorial.
This is fantastic, and I can’t wait until I have the space to give it a try…
One question: is there a way to remove the emulsion from the screens (in order to change the image)? I know you can do this with some serious chemicals, but I was wondering if there is an easier, at-home way of doing this?
Also, I’ve heard that water bills can get quite high when you own a home-printing studio. Thoughts?
Thanks!
Yup, you can remove the emulsion with emulsion stripper and use the screen as many times as you want. That’s why aluminum screens are way better than wooden ones. They stand up to multiple washes.
Emulsion stripper is unfortunately a pretty nasty chemical, so you should definitely wear neoprene gloves (those yellow dish gloves from the grocery or hardware store aren’t chemical resistant, so they will not protect your hands). You can get green or light blue neoprene gloves from an art supply store or some hardware stores. Some folks also wear a respirator. If you do this (it’s a very good idea), make sure you get filters for it which block vapours–as opposed to just blocking particles. The label will tell you what kind of blockage the filter is made for.
To get the emulison off, coat the screen with stripper WHILE IT’S DRY. Leave the stripper on the screen for about 5 or 10 minutes to let it soak in and start to break down the photo-chemicals. Then, start to scrub the screen with a hard brush until the emulsion gets cloudy and the image dissappears. DON’T FORGET GLOVES.
Ideally, you would use a power washer to get the emulsion out of the screen, but since most people don’t have one, you can use A LOT of elbow grease and spend some time getting it out with just a regular shower head or tap and the brush.
Using a power washer would definitely bring your water bill up, but I’m not sure that washing screens by hand would cause that big an increase. It’s hard though, so you might get some blisters.
Also, I don’t wash screens out at home, so I’m not sure how to properly store the emulsion stripper while it’s not in use. Definitely check the label to protect yourself from leaching chemicals.
Second time is the charm in this case. I have just completed printing on 12 shirts for our indoor soccer team (front and back logos, emblems, numbers and all)printing took about a week in my spare time. The captain and I are pretty excited for our first game today; we will all look very good. Thanks again for the instructions.
On that topic you might want to let readers know that they can coat the screen with photo-emulsion in the light, This second attempt, I did it in a windowless room with a frosted 40w bulb – I then left the screen to dry in there in the dark when I was done and it did not hurt the results and I made less of a mess. (Who knows – that might help someone starting out too)
Cheers.
thanx a great deal. I’ve been lookin 4 dis since like 4eva
Thanks for the tutorial. I’ve been wondering how this is done for such a long time. I hope to be able to get the supplies locally, in Singapore. = )
[…] Toronto author and self-publishing guru Jim Munroe has a blog for his No Media Kings do-it-yourself movement. Worthy of note is the Do-It-Yourself category archive which has articles on silkscreening, book printing, and comic production. So get out there and create! […]
Hi Shannon —
Do you have any experience using versatex ink? I tried to do some screenprinting a year ago with it, and was completely unable to make it impervious to water. It claimed it just needed a quick ironing, but that didn’t work. I finally resorted to broiling the shirts in the oven, which darkened the ink and didn’t even work 100%. Is this just a really bad ink to use, or did I get a bad batch, or maybe did something else wrong? If I could solve the problem I’d be super excited to make more shirts, but it definitely was a discouraging experience.
I wish I’d had your tutorial a year ago! Thanks for helping all us out!
Hey Kevin:
Nope, I’ve never used that ink before. If it kinda worked when you baked it, I suspect it is an industrial grade product or something– those commercial shops really cook the shirts after printing them with great results, but I just use the lower grade do-it-at-home variety.
I’m a bit nervous about cooking my shirts after printing since I can hardly even remember to unplug the kettle when making tea. The mother of a friend of mine used to heat her underwear in the oven every morning so it would be nice and toasty when she went to get dressed– but in recent years she’s had some minor mishaps and near tragedies due to forgetting sensitive articles in the cooker.
shan.
great write up,
but g+s in toronto doesn’t sell 230+mesh count screens.
does abyone know where can i buy such a screen?
I followed a link to this from a comment on my own screen printing tutorial. Nicely done.
The instructions I wrote are especially good for people who want to experiment and who don’t have extra money for equipment: http://www.instructables.com/id/EFAN6S16FTEQ2W3MOV/
There’s some special kind of satisfaction from making screens out of old curtains and picture frames…
You can get screens of any mesh at ACCU SCREEN:
5250 FINCH AVE. EAST, UNIT 10, SCARBOROUGH, ON M1S 5A5
416-751-1630
They sell used and new screens, wooden or aluminum frames as well as a good selection of emulsion strippers and screen cleaners.
Anybody have any more help with ink not passing through the screen? It goes through just about everywhere on the first print, but after that, it slowly starts getting clogged in little places making it just about unusable eventually. You can see whats happening at http://i35.photobucket.com/albums/d190/eyyo/clog.jpg. Im using speedball fabric inks to print on tshirts and fabrics. The emulsion is completely washed out, so thats not a problem. Can anyone help?
Curious if anyone know if there are places in melboure, australia,… where these materials can be easily sourced/bought??… any help would be great
cheers
Lawrence
> is the usage of a
> glass sheet primarily to keep the image on the
> transparency flat? is there any other function
> (eg refraction of light onto the emulsion etc)
> that the glass serves? i’m having difficulties
> finding a sheet of 10*14 glass, and am wondering
> if it wouldn’t be better to just tape it down.
> thanks.
yep, you can tape the transparency down, but it doesn’t hold the image as tightly to the screen– the glass is mostly useful for its heaviness so that there isn’t any shadow around the image when you expose it.
if you tape it, it should work out okay but you might get some marks on the screen where the shape of the tape exposes. you can just wash those out with the rest of the stencil and then paint them in with screen filler or extra emulsion so they don’t show up in your prints.
Anyone know of places where you can give them your design and they’ll print them out (100 or more) for a reasonable price (on decent quality t-shirts)?
Thanks,
Drakes
hey just wondering if you can give me some help at printing using a hand cut stencil and no emulsion, im just strating out and don’t wana get into emulsion just yet as i only have one screen and want to avoid the hassel of constant stripping and cleaning. pls could you give me some advice and maybe a step by step process? plssssssss 😀 thank you 😀
hope to here from you soon
pls reply to my email as wel thank you
bsillitoe@hotmail.com
I guess I left the lamp on it to long (24 minutes) because I burnt the screen and the opaque parts turned dark, it was right where the light was directed, as it moved towards the edges the image washed out fine, but overall, it was fried, I cant even get it to reclaim. Oh well. I’m off to buy another tommorrow!
thanks for putting this up on the web! i’m going to start my own T-shirt business 🙂
thank you, this brings back so many memories from High School. Now I’ve got my own business and want to design my own shirts, now I know how to. wish me luck.
hay i just got the screen printer today and im kinda ifey on using it i dont wnat to fuck any thing up i was wondering how do you take off the green shit mines red is thta right any way ya shit helped me out a lot thnax im still kinda confused on what to do tho about the green shit
hi its me agine i was wondering do you need the draweing flid for when ya burning the image or is that for if you wnat to be quick with it and a nouther qestion when you use the green shit dose just transpartn papaer do it so it soffens it up or is that douced with the drawing fluid see ij new to this shit and want to make my own shirts i just went out and spent like 100 in shirts so i wnat to do it right and how do you line up the shirts so thier centeredc asue i made one the outher day with a stencil and paint andf its all to the left and looks like shit but hell i still wear it its reping my group so could you hit me back with what im supost to do thanx
i was wondering how long do you have to burn the image into the screen could i just set up my screen and wait for like a week or do i have to burn my screen when it is done drying. also would i be able to take my screen out of the dark when it is done drying from me putting on the emulsion on
hey phet:
Yep, you can wait a week before burning the image, but you can’t take the screen out of the dark until AFTER the image is burned. If you wait a week, the screen has to be in the dark for that whole time.
I’ve heard that photo emulsion can cause cancer, and that there are safer alternatives. What else can you use?
thank you shannon, but that does suck because i’m working out of my bath room and i can’t just keep it closed for a week you know what i mean. but thank you for the info
Phet–mu advice is to store them in a brief case, suitcase, or anything that can be kept completely dark (we built a sealed cabinet for just that purpose). That way you don’t have to keep the room dark.
Be wary of using a drawer, as many drawers let light in when opening others in the same piece of furniture. A cheap brief case (usually about $1 or 2 at your local thrift store) is your best bet, and if you’re overly paranoid, run some duct tape along the seam to prevent any light leaking in…
i was wondering do i have to mix the emulsion and sensitizer in absolute dark
My son just joined the surf team at his school. They all got nice rash guards to wear as practice jerseys. Does anyone know if this process will work to put a logo on the guards that won’t wash off in the surf? Also if I have no equipment, what is the expected cost of doing this? If it will cost me 100 bucks and 30 hours, it might be better for me to take the guards some where to have them done. If it is gonna cost 50 bucks and 10 hours, then I can probably do it.
Wow, im very impressed with this! Thank you so much for such a good read!
This is so nice. I am really glad your explanation is on the web, otherwise, I would be in trouble.
[…] A great explanation on how to silkscreen posters and shirts. […]
Does anyone know how long I can leave the emulsion on my screens?
I want to print the same images in a month from now and don’t want go through the whole emulsion-exposing process again.
Thanks.
Hi Jennifer:
I have screens that are at least a year old and they print fine still. You can leave the same design on for a long time.
where did you get your $10 aluminum screen?
Thanks for you help,cause for some reason there’s not alot of tips on silkscreening onthe wweb that i found.
I’m and artist and I use to do shirts but now I’m about to get back in the business again and for myself this time.
God bless and thanks for the help.
This is a great tutorial. I’m a visual arts student at York University and am focusing on print media- specifically silkscreen. I’ve been looking for a way to print at home without using the screenfiller method and i came accross your tutorial- it looks great and i’ll be sure to try it out.
A note about speedball products- i’ve been using them for the past 4 years and have not had a problem with ink inconsistency or anything else.
Thanks for the wonderful step by step process i was looking at all the other ones that are on the web and they all suck and give some crappy stuff but yours was very very helpful so thank you very much i got a succesful screen after trying it 2 times so it all worked out good!!!
Re: Starting out?…
This should be quite a primer.
http://nomediakings.org/doityourself/howto_……
[…] Following guides such as (the very loud or excited) “HOW TO SILKSCREEN!” No Media Kings’ “How to Silkscreen Posters and Shirts“, we decided that we had to get ourselves some photo emulsion. I won’t repeat the steps involved in using the emulsion here (as they are explained in both linked articles and in many other places as well), but here is the end result: […]
How do u stick the mesh onto an aluminium frame and maintains it’s tightness??? On a wooden frame it is possible to staple them down but on an aluminium?
you buy the aluminum screens already stretched.
Its already stretched with the aluminium screens?? Meaning the mesh comes with the aluminium frame and not bought separately??
I was cleaning out a room in our home, and found about 8 silkscreen wood frames, 27 1/2″ by 19 1/2″ with screen tightly attached with designs already on them. How do you clean off the former designs from the screen that have been there for several years? How should I prepare them for new designs since the emulsion is so old? Thanks so much for the tutorial, I know nothing about Silkscreening but since I found the screens I wanted to find out how the process works. Take care, Gary in Marietta, GA
Gary:
You can get out those old designs with Emulsion Stripper (you can usually find that at art supply stores), or if that doesn’t work, you could use a more toxic industrial strength cleaner. Not sure if you will find that in retail stores though. In Toronto, we have screenprinting supply wholesale places that will send screens out to get the industrial cleaning for customers, so with a little googling, you could probably find a place near you that would do it for you too.
Check out cleaning supplies here: http://www.speedballart.com/
After the screens are wiped, you can reapply new emulsion and burn new designs.
is it ok if i use 120 watts flood bulb instead of 250 watts to dry the photo emulsion on the silk screen?? how many minutes do i need to wait to dry the photo emulsion?
thanks!
Ok.. I got cs/2 a 6 color pony xpress with conveyor belt… flash curer graphxpress blacklight exposure box.. the works.. now when i design cmyk images… i cant seem to get just the right dot size.. with indexing the prints.. have gone from 72ppi to 300 ppi… dots just wash out or by the time i get to print the colors muddle and i lose the image clarity.. so if i am designing for 305 reg mesh count and i am using 6 colors cmyk with underbase white and highlight white screens.. what do you suggest the ppi be on my original design before i go to index to get the correct dot size that will still hold in the screen and not look like a blown up internet pic.. if ya know what i mean. I have screen print seperator software but i realize now its just a spendy filter.. and i have tried the fast films seperator and it was just as difficult because of halftones.. so .. index seems to be the way for most of it but im not quite there.. but really close.. so if you have any advise let me know.. oh.. by the way.. if you want to start silkscreening.. dont start off with high res 6 color process set ups… your rip your hair out.. start off slow…. now that that is said.. you can tell i learned that from hindsight.. lol.. thanks again.
hi.. just want to ask, if you let dry your silk screen with photo emulsion for 2 hours, does it need to proceed to the next step right away without exposing it to the bright place? because i tried to let dry the photo emulsion after 2 hours and then i proceeded the next step after two days, and the design didnt show up in the silk screen after i heated it to bulb for 20 minutes..
ACETATE! Genius! No more guessing where my print will end up. Thanks!!
I wanted to let everyone know, since several people have emailed me about classes, that I will be teaching an 8 week course in screenprinting at Open Studio in Toronto, Monday nights from 630-930, running February 5th through March 26. Space is super limited. To enroll, call Open Studio at 416.504.8238 or email OFFICE at OPENSTUDIO dot ON dot CA. It costs 260 with a 45 dollar materials fee.
THANK YOU SO MUCH for your tutorial! This is great. Great starting point for my tee shirt silkscreening career!
[…] built screen printing table (i call it that cause its just a table with some hinge clamps on it) No Media Kings ? How to Silkscreen Posters and Shirts. Is this what you guys are talking about but in multi-color form? I have been thinking about a way […]
Great tutorial! I am thinking of starting up my own print studio in my house, so this will definately come in great use. Thanks again.
Hi, thanks a lot for the really helpful tutorial. but i didn’t understand the point of the acetate stage. do you use it to line up the design with the shirt? and do you put it between the screen and teh shirt? if you could clarify this that would be terrific.
Thanks a million,
DAN
Daniel Morrison
Happiness Inc – A little Bit of Conscious Evolution.
Heya, so your tutorial is indeed quite wonderful, but I’ve still been having tons of trouble getting this to work. So far I’ve tried twice and both times I couldn’t get the emulsion off after exposing it. I know one reason might be b/c of exposure time, and that I should try lessening it (again). But I’m already at 18 minutes w/ a lower watt bulb (150 photo flood bulb) than the one you’re using. I’m definitely not exposing the frame to heat or light before exposing it–could there be any other reasons why I can’t get the emulsion off in the places that were black on my transparency? Could a too thick coat of emulsion be the cause? Thanks so much.
Daniel:
Yes, the acetate is to register the image at the correct spot on the tshirt or paper. Make sure the acetate is fastened to the table at one side so that it won’t move. Then print your first print on the acetate. After that, register the tshirt or paper under the acetate so you can see where the image will end up, move the acetate (without untaping it!) and then print on to the shirt or paper. Once you go through the process once, it will be so obvious.
Quinn:
Sounds like you are not blocking the light properly. Make sure you stack the materials in the right order when you shoot. Starting from the ground up:
1. Black material to stop the light from bouncing up through the back of your transparency.
The light can get behind the dark shapes on your transparency by bouncing off the floor or whatever surface is under the screen when you’re shooting it, so MAKE SURE YOU HAVE THAT BLACK LAYER UNDER YOUR SCREEN. It absorbs the light.
What black material are you using under the screen? Thick totally black bristol board or black cloth work best. Make sure the surface is also totally flat.
2. The screen, squeegee side up.
Do you have emulsion on the side of your screen facing up during the burning process? You should have a double coat of emulsion on the screen anyway– one coat on the paper side and one on the squeegee side, but if you just have one coat, make sure it is on the squeegee side (the side facing up when you stack your materials for shooting).
3. The transparency, toner side down, oriented so you can read the image properly from left to right.
Are the dark areas of your transparency totally opaque?
Is the toner on the side of the transparency that faces against your screen? Most printers and photocopiers deposit the toner on the back automatically, so I didn’t bother including this detail among the million other details of the tutorial, but double check that the toner is on the back. If it isn’t, you’ll have to print the image in reverse.
The reason for this is that the photographic rule is always emulsion to emulsion, or in this case, toner to emulsion (they have to make contact with one another). Sometimes the plastic of the transparency film can cause the light to bounce back up through the back of the opaque areas since the film is shiny. It doesn’t always happen, but maybe is causing your problem.
4. Heavy glass on top of transparency.
If your glass isn’t heavy enough, it won’t hold the transparency against the screen tightly enough. You have to press them firmly together– again to prevent the light from bouncing back up through the back.
5. The light bulb.
How far away is the light source from your set up? Try about 2 feet. If it’s too close you can burn the screen and/ or melt stuff together.
Hope that helps.
this is the best tutorial i have read! ive been learning the art of silkscreening lately, and i understand the basic steps and chemical applications to the process, but i have been having terrible difficulty lining up mutli color prints. i had never read much about using fixed positioned acetate as a way of matching up prints, and so i thank you! i dont even have hinge clamps for cryin out loud! this will prevent many headaches for me! thank you!
Hi,
i was hoping you might be able to help me with a small question.
i was wondering how it’d be possible to remove silkscreening from a shirt. If
there was a section in particular i wasn’t fond of, or it just didn’t look
good, would there be any way to take that area off the shirt?
thanks
I wanted to know instead of burning an imange can you print it to a trasnparent paper? or is there something im missing? reply, thanks.
Luca:
Once the design is on there, it’s stuck. Most fabric inks need to be ironed after they’re printed for the colour to become wash-proof, so the best you can do is to wash the shirt or fabric after it’s printed but before it’s ironed. But even then, the design will only fade, not disappear.
Great tutorial! this is the most in depth tutorial i’ve encountered, and it really has clarifyed a lot of things for me.
keep up the good work!
This is a great tutorial, but i was wondering if it is possible to cut your stencil out of black poster board and use that to burn into the screen instead of printing it onto a transparency.
Nick:
Yep. You can use any material that will block the light.
[…] forums for a while, and just started posting (with questions). For the general idea of things, this tutorial is pretty good, from No Media Kings. Good […]
[…] I have found some good stuff on the net for screen printing. Artist Shannon Gerard provides No Media Kings with a very helpful screen printing tutorial. […]
My friend and I are planning on creating an on-the-side indie shirt-making company, and this tutorial was so much help! Thanks a lot! I have one question, though, and it may seem quite amateur-ish, but… Is this silkscreen process one-use-only? Like, if I wanted to make 10 shirts exactly the same, would I have to reprint the image and reprime and everything?
Again, thanks so much!
Rachel:
You can get dozens of prints from one screen without having to recoat, expose etc… If you plan to print more than say 25 or 30 copies of the same design, take these steps at the exposure stage:
Double coat your screen in emulsion (the tutorial already suggests this)before you burn the design in.
After your design is burned in and washed out, let the screen dry and then “double bake” it– throw it back under the 250 watt photo flood bulb WITHOUT the transparency, glass, etc… for another 20 minutes or so. You don’t need to do this in a dark room since the screen has already been burned. This extra step just makes the emulsion extra hard so that your design won’t break down as fast with multiple prints.
If you do those two things, you should even be able to get hundreds of prints of the same design. Just keep an eye on each print as you make them to make sure you notice little areas of the design that may break down or dry up with ink as you’re going. You can easily correct those kinds of interruptions by cleaning the ink off, drying the screen and then starting again at the print stage.
Good luck with your company.
Thank you! very detailed rundown of the process
Thanks so much for the help!
😀
Hi there, I just cannot get one single print right! I am trying to print a reverse image (loads of areas to print) on paper. Even though I am taping the paper down, it continuously get stuck to the mesh. Tried experimenting with ink viscosity with no success. Any ideas please? Using acrylic paint, on normal photocopy paper, off-contact printing at around 1/8 inch distance, hard rubber squeegee. Thanks!
[…] contains all the materials you need (like the one I linked to). This tutorial might also help: No Media Kings ? How to Silkscreen Posters and Shirts If that doesn’t help, then hopefully other members will be able to give some better input. […]
Hey Shannon,
Many thanks as I have been evolving as a screen printer for the last two months and the conception happened here. (didn’t know you were a Mom in Japan, did ya?)
Anyway, it’s been great fun, a real brain tease and I’ve worked through the regular pitfalls but as I am in my final phase of this birth, I am having some splatter issues. As I lift the screen off (I suspect that’s when) I’m getting splatter from the separation. I tried to pull the shirt tighter and tuck it in from the bottom, but not even any improvement. I’m getting 7 to 12 dots of the smallest degree, but as they gather, they are visible.
Any help from anyone?
Thanks in advance,
david j.
Hi David:
Glad the tutorial is helpful. Are you sure the dots on your shirts are splatter, or are there pinholes in the screen that are letting little flecks of ink through when you print the design?
When your screen is totally clean and DRY, hold it up to the light, or put it on a light table and make sure no little pinholes exist in the blocked out areas. If you see any, just paint them over with emulsion and let it get hardened in the light, or use Screen Filler, a dark reddish substance made just for the purpose of blocking in areas you don’t want to print.
Hope that helps. I can’t think of how the ink would be splattering since ideally the shirt is squeegeed really tightly against the screen while you print, unless it is happening when you pull the screen away from the printed shirt. In that case, you could try using ink with a higher viscosity (less runny).
But it sounds like a case of pinholes to me.
Thanks for the tutorial, it was very helpful. We have silk-screened a few limited edition prints (paper) thus far, and struggle with the ink drying in the screen after about 5-10 prints. We use Speedball inks as well, and use about 10% retardant mixed into the paint. You mentioned “flooding” the image between prints. I wasn’t exactly sure what that means – does it mean spreading ink on the screen between prints? If I do that, don’t I risk getting ink on the paper in a messy way when I go on to the next print? Just wondering what your suggestions are…thanks for your help!
Sub Studio:
Yes, flooding means you run the squeegee over the image area after you’ve lifted the screen off the paper (or fabric) to fill the image area with a layer of ink.
You don’t want too much or the image will bleed through the back pretty quick, just a thin even coat that entirely fills the image areas– no dry spots.
And make sure you paper is not still stuck to the back of the screen. The flood should be done without any printing surface under the screen at all.
Flooding is essential for keeping the screen wet. The reason your screen is clogging and drying after so few prints is because the less ink you have in the image area between prints, the more air can get at the little that is there and dry it.
No, it won’t mess up your paper in between prints because what you are actually printing each time IS the ink that you’ve flooded in between. The ink that you pass under the squeegee is mostly just for lube.
Try a run this way and I think you will see a huge improvement.
hi, shannon
great tutorial, really helped me out.
only problem i am having now is that when i am printing i am often getting big empty streaks in the direction that i am pulling the squeegee.
a couple things that i think might be causing this: maybe there’s not a good enough contact between my squeegee and the print surface because 1 – my squeegee is wider than the image i am printing so the whole thing’s not lubed 2- i’m not pressing hard enough? or maybe 3 – my screen is warped or something since i got it second hand.
also, the streaks aren’t always there.
can you help me out? thanks a million,
brady dee, mtl
Brady:
The streaks could be caused by a few factors.
Are you flooding in between prints? If your screen is drying out that could cause streaks.
Is the ink consistent? If there are dry blobs in the ink, wherever they get under the squeegee can cause streaks.
Is your table top pretty flat? And is your screen really wonky? Anywhere that the screen and printing surface don’t make flat contact can cause streaks.
Are there any dried blobs of ink caked onto your squeegee, or are there any nicks along the edge of the squeegee that touches the screen?
Streaks are most often caused by imperfections in the squeegee not the screen. Always clean it really well after printing and store it in such a way that the rubber doesn’t contact any surface that could cause it to bend or get nicks in it.
Also, do you have the right kind of squeegee for your printing surface? Cloth needs a more pliable squeegee with rounder edges and paper needs a stiffer squeegee with totally sharp edges. The more absorbent the surface, the more pliable the squeegee should be.
thanks for the tips. lets hope i get better results next time! 😉
brady dee
i’m an artist and i have some of my shirts in stores here in calif. i want to have more control over the process . i usually draw what i want then i might bring it into photoshop and or illustrator. i want to know what i need to burn the image on to the screen. and i want to know how to do discharge and plasticharge. please help
any information on the technique of ‘discharging and plasticharge would be appreciated. how do you burn the image on to the screen also. thanks
David:
Plasticharge is a bit out of my scope. Sorry. Instructions on how to burn the image on a screen form the bulk of the tutorial already.
[…] No Media Kings » How to Silkscreen Posters and Shirts (tags: clothing design howto tutorial crafts) […]
Hey Shannon, this tutorial is precise, to the point, and simply the best i’ve come across in my long search for screen printing tutorials all the way from new delhi, india! thank you so very much, i’ve got my notes (it’s 5am!) and can’t wait for the stationary shops to open, i have no clue what inks are available, waiting to find out, hope they come in the specifications you mentioned (inks/mesh etc)… 🙂 can’t wait to try it out!!
When ironing the final printed shirt/fabric should there be something between the iron and the shirt/fabric, or should you iron directly on the print?
Andrea:
I usually put a piece of printer paper (just regular white paper) between the print and the iron, but I have also ironed directly on the print (if the ink is really dry) and it doesn’t hurt it.
Well, I’m about to jump in there and make a small run of shirts for my band, so wish me luck. I noticed in the photographs that when you flood the screen pre-print, you have the screen raised up at a corner with a roll of tape – I presume this is because you don’t want to get ink on the surface. In the next picture, when you are printing to the acetate, the roll of tape is still there, or appears to be. I got a book with a kit I bought that suggested putting little risers on the frame corners to create a “snap” or gap between the screen and the shirt, but nowhere near the height of a roll of tape! Can you clarify this for me please? I get the idea of a 4-5mm gap, so the screen is pressed against the shirt when you draw the ink across it and then automatically lifts away, I just wondered what your thoughts were on that…
Or… are you flooding the screen and THEN lowering a “wet” paper side onto the shirt, like a stamp almost? I have been under the impression that you had the screen on the shirt and THEN drew the ink across. I guess Ill find out soon enough. Great tutorial though, many thanks. There are so many on the web – we need more pictures!!!
Shannon!you rock my world!!!
thanx so much!!!
Fabricion, Sydney-Australia
Many thanks from Brasil!!!
I was very impressed with this tutorial. I am an art teacher and it has been years since I last silk screened anything. I decided to print my friends picture on tee shirts for his 50th birthday. I was successful mainly because of your great tips. I used real silkscreen frames I had gotten from a sports store that was no longer printing shirts and I refabriced them and coated them with the photo emulsion and got a 200wt. bulb ( couldn’t find 250) and the rest is history’!! I dazzled them in New Orlenas when we pulled the shirts- no one could believe I got the instructions from the internet!! but i did!! Many, many thanks for making a complex project a sneeze!!
I can’t get the registration to line up perfectly. My design is white with a black outline- printed on charcoal gray. The black outline never lines up perfectly around the white- even though the acetate is at the perfect spot…
Any advice?
I use 1/4″ masking tape for reference points on a shirt with little contrast from the printing color. I mark a longatude and a latatude line and make the same line on the screen frame so that they line up perfecectly. a flashlight between the screen and fabric will help too.
Boom:
Did you print the image onto the acetate when it was flat against the table? When you put the tshirt underneath it to line things up, the thickness of the tshirt lifts the acetate just enough to displace the registration. Try printing your first image onto the acetate with a tshirt underneath to compensate for the lift.
[…] NO MEDIA KINGS […]
this has been a great site for silk screening. but can someone please elaborate more on the “Preparing Your Artwork”. i’m currently using Photoshop and Illustrator. for example, If i have a jpg file that I would like to use, how could i manipulate it so its good for silk screening? Please help. I’m stuck at “preparing your artwork” step. Thanks!
reuben,you can do your artwork in using coreldraw.
how about using a jpeg file with 72 dpi’s. is this ok for silk screening? i’m really new to this. also if someone can give me some advice in color separation with jpeg’s… thanks
hey reuben.
72dpi is computer screen resolution, for printing of any kind your resolution should be 300dpi for you source image (in the case of silkscreening your transparency should be printed at 300dpi or it will appear pixelated).
what sort of questions do you have about colour seperations?
what are some techniques in converting a 72 dpi Jpeg into 300 dpi without the jagged edge? i supposed i could print the jpeg, trace over with black pen, re-scan, edit in photoshop, and print again on transperancies. any easier route?
i have a picture in the link below, its a jpeg. can i color separate it?
http://www.tattoosymbol.com/articles/lotus-flash.html
Rad!! I’ve never silk-screened and you totally broke it down for me. I’m excited to do some ART
peace
this tutorial rocks! i learned a lot on how to make colored prints. so that’s how!..
I can’t wait to print my own t-shirts.
particularly vintage tees!
awesome awesome Home Screenprinting Tutorial by Shannon!
A big thanks to the one who shared this on his equally awesome blog… thanks Jim Munroe! 🙂
[…] This tutorial can also be found on nomediakings.org […]
What software you suggest the easiest way to separate color for multicolor design.
Great stuff. We started there. There should be more info like this around. Great way to start messing around with screen printing
I just started printing the other day. I used screen filler and made a negative, the two products the instructions said to use to wash out the filler are not in any stores near me. what do u use.
great site
I’d like to know where I can find the right material for silkscreening near Ottawa. Thanks, and, by the way, your page just saved me $100!
Camille
Noah:
You can use Mr Clean or some other household cleaner (I use Simple Green) to get the screen filler out. It takes more elbow grease, but works.
thanks for the awesome tutorial! can you make your on screens? i can’t find big acetate sheets or rolls anywhere in the Detroit area….any leads?
I used your tutorial from start to finish, established a pretty good system that worked well in my house, and ended up with a beautiful product.
Thank you very very much for taking the time to post this! You have performed a valuable public service. I will always footnote the wisdom from this page as having been key to my screen printing success.
Love the tutorial, I’ve tried it myself as a first time screen printer but I always wind up with the ink bleeding out under the screen. It gives it this blob like look. Am I using too much ink or pressing too hard? Any tips?
Martin:
Maybe your ink is too runny or you are pressing too hard.
Also make sure you have the right kind of squeegee for your printing surface. Ink can blob if you use the wrong kind. Hard squeegee with sharp edges for paper, malleable squeegee with rounder edges for cloth.
The other important factor is holding the squeegee at the right angle while you are printing. 45 degrees is best. If you hold it more upright, or slant it too much toward you, the ink will blob.
One of 2 greatest and most helpful tutorials on the web. I’m just starting out, and it’s so amazing! I noticed that all of you mention the use of glass when exposing the coated screen. However, when reading the instructions provided by the Speedball company, they mention that plexiglass can be used as an alternative. Is this just as good as glass when letting through the light and weighing down the acetate? Or do you prefer the glass because of its weight? I’m tired of breaking my glass, and I was wondering if plexi would be a safer, yet identically effective alternative. Thanks!
Hi There. I love this tutorial. I am having a problem with my screen making process and I am wondering if anyone could help me out. I’ve been trying to burn my image onto the screen and each time I wash it out, the emulsion gets slimy and eventually completely washes away. I am leaving the screen under the lamp for about 25 minutes, and can see a shadow image when I’m done. I’m also letting it dry for about 40 minutes in front of a fan. Any thoughts?
finally! i know now how to transfer my design to the silk screen. it’s the sensitiser and emulsion is what i need. thanks for the great site!!! awesome dude!!!
– PHILLIPNES –
finally! i know now how to transfer my design to the silk screen. it’s the sensitiser and emulsion is what i need. thanks for the great site!!! awesome dude!!!
– PHILLIPINES –
what are the different types of ink used for silk screening. also what are best used for clothing.
I love this tutorial. I’m going to try it.
How do I tell the shop the type of lamp I require? If there isn’t 250Watt, Will 150 or 200 Watt do as well?
Can I simply use bright mid-day sunlight instead of using 250Watt lamp, to harden the emulsion ?
Thanks very much anyway.
I love this tutorial. I’m going to try it.
How do I tell the shop the type of lamp I require? If there isn’t 250Watt, Will 150 or 200 Watt do as well?
Can I simply use bright mid-day sunlight instead of using 250Watt lamp, to harden the emulsion ?
Thanks very much anyway.
Hi There. I love this tutorial. I am having a problem with my screen making process and I am wondering if anyone could help me out. I’ve been trying to burn my image onto the screen and each time I wash it out, the emulsion gets slimy and eventually completely washes away. I am leaving the screen under the lamp for about 25 minutes, and can see a shadow image when I’m done. I’m also letting it dry for about 40 minutes in front of a fan. Any thoughts?
love this tutorial.
by the way, where can i buy the emulsion and the sensitiser? are they available in australia?
How do yo get the line art. How to i convert a picture
We are into screen printing business here in the Philippine. We only use film instead of photographics and its too expensive to use film rather than photographic thing, thanx that you have this type of tutorial.
hey. this is a great tutorial! im just wondering, could you explain how you make the print colored?
its a little cloudy too me.
thanks a bunch!
hey thank you so much for this tutorial! me and my buddies are planning on starting a clothing company and this helps a million. keep up the good work and thanks again
HI THERE I’VE GOT A PROBLEM IN MAKING A SCREEN I FOLLOWED YOUR METHOD BUT THE SCREEN IS NOT WASHING OUT I CAN SEE THE IMAGE BUT THE EMLUSION IS NOT WASHING OUT COMPLETELY PLEASE ADVISE. MY EMAIL ID IS ronald.dias@sympatico.ca
THANKS
RON
Hey! Great information! I ran across your site and now things just got easier in my life. I wanted to ask you how you would print more than one shirt with these steps?
Thanks again for the great ideas!
Take care,
Lynette
[…] August 24, 2007 at 3:07 pm · Filed under Uncategorized Information […]
[…] Next, how to Silkscreen Posters and T-shirts. Yay, […]
This is very useful, thanks for putting this up! However, I live in a small apartment, can’t really set this up at home.
I’m wondering anyone knows if there’s a studio for silk screening I can rent in Toronto downtown?
I feel confident and will “try this at home, kids.” Thanks, Shannon! Now, has anyone in NYC found a good source for screens, ink, emulsion, etc. in the local art stores in Manhattan, below 34th St.?
If you are printing onto fabric, can you add another color (ie the boxing gloves)? if so, do you let the first coat completely dry, and wash out the screen and start the printing process over?
thanks so much!
ja
Wow! this is a really helpful tutorial!
=]
[…] to make your own printed shirts and things? It’s not for everyone, but I found a nifty how to guide on silkscreening in case you’re ever […]
….. i think it is very easy process than others.its help me in my future because i m a student of textile eng.i wanna learn more abt screen printing so give me some web site abt that .
[…] es mir besonders angetan – obwohl ich sie selbst noch nicht ausprobiert habe – das Tutorial wie man Poster und T-Shirts bedrucken […]
thank you for your tutorial! i followed your instructions and was able to make my own shirt 😀
i plan to make more shirts in the future! thanks again!
here’s what i was able to make –> http://jparazzi.multiply.com/journal/item/49/first_tee-shirt
[…] signage has quite a few different approaches that you can take. A few of your options include silk screening, spot vinyl colors, large format digital printing or hand painted. Each one of these techniques […]
I’m taking a screen-printing on fabric class. Just like working on computers there as several ways to do things, screen-printing is no different. In my class, the light used to expose the emulsion is fluorescent lamps under a glass stand. You place the drawing and screen on top of the light. I set up my darkroom is a closet. I followed your step-by-step instructions to set it up and it works wonderfully. I use a black light and I went to Home Depot and purchased a flood light that took a maximum wattage of 300. I also purchased a halogen lamp that took two 300 watt bulbs. It didn’t work as well as the flood light because I found I would have to double the 15-minute exposure time. Since it is obvious that the flood light works better, I’ll be purchasing another one. I appreciate your instructions. They have been truly helpful.
[…] trying to source and make a small screen printing studio. If your in the same position then this is the place to go. No Comments so far Leave a comment RSS feed for comments on this post. […]
Your tutorial is just great.
I have whole bunch of tshirt which I enjoy wearing because of the quality and the feel. However I don’t want to parade around the coporate markings of the shirt. Do you have any suggestions, ie. chemicals that will remove silkscreening from a t-shirt. Hopefully something, that is not that corrosive as to not damage the t shirt. As well, after applying such a chemical would washing in a washing machine be sufficient?
thanks for the help, and keep up the good work.
how do i test the silkscreen when its done? i have been useing masking tape and i think its to much. what should i use?
hi. do u use Hardeners? wats its use in photo emulsion silkscreening? im just trying to figure out if i should buy it just in case. thanx for the “how to”. great job
Awesome tutorial. I’ve been experimenting with water based Speedball acrylic inks to print on wood panels using handcut mylar stencils. I have a metal 156 mesh and rectangular hard squeegee. I seem to have an issue with small bubbles appearing around the edges of each of the cut out shapes when printed. These show up if I use the ink straight out of the jar but becomes even worse if I have to mix colours together or extender into the ink. I’m just stirring the ink when I do this, not trying to froth it up! Do I need a finer mesh or something. Help!!
Thanks for a great tut. God bless,
T
Have not done any printing in some time. Find what I used not avialable any longer. Have two small projects any need some advice on light sources.Hvae a 24 inche light table with 6 daylight tubes. Can this be used with the Diazo Emulison.Do they provide any information on expouser time. Hvae use a photo flood on smaller projects Please help.
you can used the sunlight for expousur in just 30sec.
hey i was just wondering if it is possible to take a screen you have made out of the frame. and then at a later time put it back in the frame and use it. so that the frame can be used for multiple stencils
great tutorial.. i’ve been doing silk screen printing for about 2 yrs now and i’ve tried a lot of textile inks already. and just recently, i bought this opaque white paint and it doesn’t flow easily. i mean, the paint is not that thin as i wanted it to be and i find it hard to use it in printing because it’s hard to manipulate and it sticks. what should i do with it? what remedy could i mix with the paint to make it thin? i heard that a transparent base would do the trick. any other suggestions?? thanks for helping in advance!=)
I would just like to start off by saying thank you, this tutorial has helped my friends and I print many, many shirts. But we’ve been having ink problems. First we used the Speedball Opaque White (on black shirts), but the ink would fade away after washings. So we moved on to the heavy duty Super Opaque White Union Ultrasoft Plastisol Plus Textile Ink along with the Reducer/Detackifier. But when we try to transfer the ink onto the shirt, it either globs on, or barely goes on the shirt. Please solve our frustration.
Hey Charles and Andy:
White is so hard to print! It is the worst! You have to thin it out to get it to go through the screen– yep, transparent base is the best solution because if you water it down, it wont be as colour fast in the wash– but then when it’s thinner it doesn’t look as opaque against dark coloured shirts.
The best opaque white ink I’ve found is from a company called Permaset:
http://www.permaset.com.au/permaset/permaset
Oh yeah Andy– I forgot to ask if you are ironing your shirts before you wash them?
If you don’t iron them (on the hottest setting for about 2 minutes, directly on the design or through a piece of bond paper) then the colours don’t set.
Yes, but we usually ironed the shirts inside out, or with another shirt over top.
Thanx for a great short, sweet and efficient tutorial on silkscreening, it filled me in on exactly what questions I had. Thanx again, Scott.
Thank you so much for taking time to make this awesome tutorial. So informative and detailed! and entertaining to boot.
I don’t understand one thing. How does the image appear onto the shirt? I understand you need to print your image on transparent paper. Then you cover the screen with emulsion. After that you add the transparent screen ontop of it, and “expose it”. What happends during this process? From the images it seems that the emulsion somehow disapears from where the ink was. How did that happend? Did it somehow burn the emulsion away? This is the part that confuses me most. Someone help!
MICHAEL: The emulsion is photosensitive meaning when it is exposed to UV light, it hardens. The transparent image you put onto the emulsion has areas on it that the UV light cannot pass through (the black areas on the picture) which will leave those areas un-cured (not hardened. When you use the cold water to wash away the parts that aren’t hardened, what you have left is the open areas that the paint can now pass through. Everywhere else on the screen is filled in with the emulsion which is now hardened. Hope this helped.
Robert,
Ah thank’s for clearing that up. I was thinking it in reverse. My last question however is with colors. I plan to make shirts with serveral colors, and most of them not your standard Red, Green, Blue. How would one mix the colors accordingly? Would you do it yourself following a guie (mix 2 parts this, one part this to achive colour #37563? Or would you take it into your local silkscreen store and get them to do it?
Thanks,
Michael
Michael,
You can mix your own ink shades quite easily, but keep in mind that the proportions arent always what you think. For instance if you were trying to mix a true orange you would want to start with yellow and slowly add red until you get to the shade you want, a 50/50 mix of the two colors ends up orange red. Also, many stores/online retailers sell/mix ink to match the pantone colors, you would probably need to figure out what pantone color is closest to the one you want, because i’m not sure what luck you’d have trying to specify your color in rgb hex, due to the differences in the additive and subtractive color systems. Hope this helps, -mat.
Great guide! Helps alot! I’ve been getting some shirts done at my local shop, but with this I can do it at home =P.
Just got a question, anyone know of any other shops like “G&S Dye and Accessories at Dundas and University” ? I emailed them awhile ago and never got any reply’s. I live in the GTA (Mississauga to be exact) and while I do go downtown often, it’s usually for a night of drinking so poping into the shop is out of the question. Not to mention driving downtown is a hassle. So would anyone know of other shops?
My second question is, would anyone know where I can purchase American Apparel clothing at reasonable pricing? I checked there site and seem to charge a ton, not to mention then I have to ship it. Also Id be looking at getting about a dozen shirts at one time, so I don’t beleive I qualify for the Wholesale. I check G&S Dye, and they only seem to sell Fruit of the Loom. So could anyone help me please?
Wow
I’ve been around xx.. shops photo- hobby- you know- stores that should know about this stuff: nada
I made some Sex Pistols , Ramones and Iggy 30 years ag, so I thought maybe it was too dangerous or outright poison- sniff- to work with since they didn’t seld it anymore.
Thanx alot for your input. Now I can start it up again- making prints, posters and paintings as in before
What’s is really strange is that I’ve Googled this for years ,& presto: everything as I remember it, couldn’t be better.
Great thanx and HNY
Ranx-
Ps. Downloading as PDF, Hope it’s OK with you.
Your is the gratest- inc. all the far out links.
But take a look at mr. Silk: http://www.silkscreenbiz.com/front-pic.jpg
As seen on TV…. I guess
Sam, http://www.fruitactivewear.com/catalog/detail.cfm?ID=1&range_no=5930R is the link to the shirts that Threadless.com actually uses. For the American Apparel about the only place to buy it is through their website. So I suggest buying in 3 or 7 packs. Though this does mean that to make any money on your shirts you will most likely have to sell them for 20-25 dollars. Which depending on your design and the quality of the print, could be well worth it. Though I’ve always used Fruit of the Loom that Threadless uses or Gilidan 8800’s. Find what works best for you.
found tutorial very informative, but it made me think twice about going into the t-shirt designing and producing business.
I just bought a silkscreening kit today and damn was this site super-helpful!
I love your detailed explanation, photos for reference and the fact that you provide the cheaper alternatives to what i would have bought at the store. (the red mary light i never would have guessed)
You have my endless gratitude.
I recently purchased a 4 color screen press, from what I can tell I have to print every color seperatly allowing each color time to dry, what is the advantage of the 4 stations if I will be changing the screens to print each color anyway?
This is a great tutorial for doing it at home, and the results are great, almost professional looking. Well done
Cool!!!This is what i need!!!Im actualy searching a detailed process of screen printing…KUDOS to you sir!!!
Thanks for the excellent tutorial.
I found this site with really cheap t-shirts
http://blanks.ultimateimpressions.com/T-Shirts-Short-Sleeve?gclid=CJncpfXYsJECFR8UlgodtC1seg
So i thought that you guys might like it
Excellent Tutorial!!!! thanks
I saw alot of time was put into your tutorial for silk screening…I just would like to know of some books that could offer step-by-step instructions for dummies like me just getting started ? Keep up the good work.
Awesome tutorial. Thanks for all the help. I used this to make shirts for my friend’s band. Here’s a pic.
http://a476.ac-images.myspacecdn.com/images01/91/l_17c0391fca55756737457db3a01fedbb.jpg
I would definitely recommend this. The only thing I had to change was that I had to let the emulsion dry overnight, because the first time I tried drying it for two hours, and some of the minutely detailed parts came off.
Could you help me on this issue?
I recently made my first screenprint. I did the stencil method and only made two prints on fabric. But I wasn’t able to wash the ink all the way off. It seemed like it dried really quickly. I used Speedball and didn’t add any retarder. I used Mr. Clean, and I used various soaps, but I could not seem to get the screen white again. I’m wondering if this is normal…? Is it just the threads in the fabric that got dyed, or do I really have paint stuck in the holes?
I soaked it for a while and I kept scrubbing and scrubbing, but not all the color would come out. What to do?
This is a wonderful resource. My appreciation.
I have set this up as described and I am feeling pretty good about it but I feel like when I turn the photo flood bulb on (which is in a silver hood like yours) the light seems to flood the entire room reflecting off the white walls (is that a problem) and it makes me wonder why it is necessary then to have the room be so completely dark unless I am doing something very wrong!
It sounds like you just stained the threads. That is completely normal– most of mine are stained. The only thing that matters is that the holes in the mesh are clear of ink or filler or any kind of junk. Just hold your screen up to the light and make sure there are no dark holes where light is being blocked.
Have fun!
I tried to ask this earlier but it didn’t get posted…I have set my dark room up as described, I think, but when I turn the flood bulb on (which I have in a silver hood like yours in the picture) it floods the whole room with light, reflecting off of the white walls (do they need to be dark?). It just makes me wonder why the room must be completely dark when there is light bouncing all over the place (but the screen and glass are resting on a dark surface). I am doing something very wrong…?
I appreciate the instruction.
Could you help me please:
i have tried to do a screen print and it went horrible wrong i could not wash all the ink off
Kelly
Kelly, are you using water-based or solvent-based ink?
Solvent-based needs to be washed out with chemicals from my understanding–I only use water-based because the cleaning up of everything is so much easier for me to do at home. Also, the longer you wait after printing the harder it will be to clean out the ink–you don’t want it drying out in there. Ideally a power-blaster is best to rinse it with but I know people have used 409 and other cleaning chemicals before.
I took alot of photography classes in high school and college, so I was already familiar with the dark room, so this was very easy to follow. It was a success on the first try. If you are afraid that the black is not dense enough, you can fill in with red permanent marker, it acts as black (emulsion is protected in red light!) thank you so much for this information, I Love it!
Heather
Alexandra,
if you didn’t get an answer yet,
it is okay that the room is light once you get to this step. You need to protect the emulsion from light until you have it ready to be exposed (once the image is blocked off!)
thanks for the feedback– I did go ahead and do it the way I had it and it worked just fine on the first try!
great tutorial– all I want to do now is create create create!!!
Anyone know how to get a glossy finish using silkscreens? I print onto fabrics and use air drying Speedball fabric ink. A baked Plastisol set-up is a big investment, so I was hoping that there is some sort of medium to add to my Speedball inks to give them some sheen. Can anyone help?
Thanks!
This is one awesome guide! Great thinking and thanks a lot. Now to put the geeky stuff I want to put onto a TShirt I like.
Hello, first of all, great tutorial. I have a question, for printing WHITE onto dark garments, should I use an opaque ink as others here have suggested?
This is an amazing tutorial, thank you so much! I am making some signs so I’m using a large screen — 30″x40″. I exposed it under a 250 watt photo bulb for 15 minutes, but when I went to wash it out, the emulsion got kinda mushy and started to wash out in places other than the image I burned onto the screen. Do I just need to expose it longer? Also, I am wondering if the photo bulb could be a problem. When I went to a photo shop and asked for one the sales person asked which I wanted – the blue one or the other one. I got the blue one, is that right?
this was a very interesting and easy method, thanks
i think my favorite part is the blessed virgin mary!!! love it! and yeah, thanks for some good tips, this is my first time using speedball emulsion …
I have been screening for years…..not bad guys, actually rather informative for the novice. Hey if you have any questions feel free to ask me via a comment here, always glad to assist
Love the post and the tips. Thanks.
some weird streaks keep appearing when I attempt to rinse my stencil out and when I do that, the stencil doesn’t come out. what is happening here?
Hey Shannon,
This is great, I just have one question. How exactly did you convert your photograph to a line drawing. I have been experimenting with photoshop, but I can’t seem to get it as crisp and solid as yours. If anyone else knows of good methods to reduce to crisp line drawings with photoshop, your help would be really appreciated…thanks in advance! -Kind regards
Hi Ashley:
Sorry! I should have been more specific– I draw the line drawing by hand, using the photograph as a reference. You could also trace a photo and then rescan your drawing back into the computer.
Dylan:
Can you be more specific about the streaks? Streaks will appear all the way along the screen as you wash it but if you thoroughly wash both sides of the screen and wash all areas of the screen, not just where you have the image, the streaks will disappear and the stencil will wash out.
If the stencil doesn’t wash out at all it is probably because you exposed the screen for too long. You could keep reducing the time you shine the light on it by 3 or 4 minutes until, by trail and error, you figure out the right exposure time for your particular set up.
Actually you can avoid trial and error, through 1 trial. Bring out your piece on the acetate, set up a screen, and put your design (or even just something that says Test on the acetate) at the top, and cover the rest with a piece of cardboard and burn for 2 minutes, move done, and expose for 2 minutes. Keep doing this till you fill the screen. Say you did it 5 times, when you wash out the screen. The top one will be a 10 minute burn, the next one down 8, and on down.
Shannon:
It’s not so much a streak it is just a line that keeps appearing. And when I try to thouroughly wash the screen to get the emulsion out of the stencil that is when the lines appear.
is there any way to prevent this?
Concerned about caustic qualities of the emulsion. Are there safer products on the market? (That aren’t said/known to cause cancer)
Jeff:
I’m not aware of any non-toxic processes involving photo emulsion but there are several ways to produce a stencil on a screen that don’t include photo-based processes at all.
Craft Grrl has a really great tutorial here: http://community.livejournal.com/craftgrrl/3674467.html
You can use her suggested materials or try Speedball’s screen drawing fluid and screen filler which are both waterbased products.
Dylan:
That line sounds mysterious. Is there anything blocking the light in that pattern on your glass or any other part of your set up? Maybe there are lines through the image?
Jacob’s suggested time trials are awesome– try that and see what time works best for exposure. If the streaks are a result of the exposure then that should make things less of a mystery.
there might be something blocking.
maybe it was because i didn’t degrease it good enough.
could that be?
Dylan:
It could. There might be a fingerprint or something on the glass, like Shannon said. Could also be that the screen wasn’t cleaned thoroughly before, leaving an afterimage. Easiest thing to do without spending a ton of cash is to reclaim it again. Hold the screen up to the light and if there’s a ghost image, wash it again. Also, when you’re exposing, be absolutely sure the positive is flat. It’ll cause a shadow and that will burn in too.
Ashley Vader:
Inkscape is a freeware line art/vector tool. It’s not too user friendly, but it’s very powerful. There are a ton of tutorials to get you accustomed.
I have been successful printing a few times already, but would like to know how any of you guys/gals print large images.
Let’s say I would like to print an image larger than the size of a piece of printer paper (say a large poster or oversized t-shirt graphic) and my screen is large enough to do so, what do the professionals do? Do I take my original graphic to a print shop and have them print on extra large transparency/acetate (if that’s even possible) or is there a simple way I’m just not thinking of?
Darren:
You can print out a large format image on cheap white paper– like anything you’d photocopy onto, not too thick and not glossy. Then spread vegetable oil all over it until it is translucent, dry the oil VERY WELL and expose that. You’re basically turning the paper with your image on it into vellum. It is way cheaper than getting a large format acetate made.
Or, you can also just expose the image on thin white paper without oiling it– you just have to up your exposure time by quite a lot.
Darren:
I work in a shop where we do “color by number” prints for local artists as well as shirts. The digi artist adjusts the colors to b&w in Corel or AI, then sends it to the gigantor Designjet printer. Burn it straight to a large screen (with a carbon arc lamp; they’ve been discontinued for many years), wash out the emulsion, and set it outside to dry. This is, I suppose, a professional way.
Our shop charges $15 USD per transparency.
Or, you could try the veggie oil way Shannon describes. Just make sure it’s DRY and not kind-of dry.
http://en.wikipedia.org/wiki/Arc_lamp
Almost forgot!
The carbon arc is a QUICK way to expose the screen. It’s basically the light that comes off a welder. It’s extremely bright and could do some serious eye damage if you stare at it. Large screens (2-foot and up) take about two minutes and thirty seconds to expose fully; the smaller ones even less. The only problem is finding one..
Thanks Shannon and John for the quick response and great tips!
I have one more unrelated question that may help out a few others as well…
Many screenprinting methods suggest leaving a small space (about 1/8 of an inch) between the screen and the surface you are going to print on. What is the reasoning behind doing this, and is it important enough to re-set up my work area to be able to include this small gap as opposed to the screen resting directly on the printing surface?
Darren:
I would assume they mean from the edge of the image to the edge of screen itself. If that’s the case, it could be for masking off the edge so you don’t get ink into a place where it’ll become a problem when you reclaim it. Our shop puts plain packing tape along the edge of the frame onto the scree itself to prevent that.
Actually, thinking about the eighth of an inch seems to bother me. What you want, typically, is for the screen to be as flat as possible against the platen and for the shirt (or whatever) to be stuck to the platen. Especially if you’re doing a multicolor. If there’s not enough sticky on the platen, when you do the first color, there’s a chance the screen will pull the garment a little when you lift up the screen. That little bit is a big difference when you’ve got everything registered perfectly.
If that happens, honestly, the best thing to do is to run that piece through the dryer or take a heat gun to it. Clean the screen thoroughly (lacquer thinner works best for plastisol) on the front and back so you can see the image through it. Re-register it and pull the second color. It’ll probably be a tiny bit off, but it’s much better than totally off.
Don’t know if this answers your question, though. =/
^Thanks John. In many other “tutorials” or “how-to’s” they mention making sure you have this mysterious small space I’m talking about, it definitely doesn’t refer to taping/blocking the edges and corners of your screen… on youtube there is a video posted by the company Ryonet detailing how to screenprint white on black tees, where the printer addresses this issue and shows us his solution, which is balling up a piece of tape and placing it (I think) on the underside of the screen.
I don’t choose to do things this way, and obviously you don’t either, and to be honest I doubt it truly affects the end result.
As we all know, everyone has their own way to print, and if you weren’t familiar with my question than this is likely just one of those little “tricks” that may benefit a specific style of printing, and either I am too inexperienced to realize its benefit or my projects are so simple that this issue is irrelevant. Thanks again though for sharing your tips!
Hah. Well then I suppose it’s something I’ll have to look into. Hell, even ask the old guy at the shop tomorrow! =)
Darren:
It’s fresh on my mind; an answer, I think. I asked around this morning and the concensus is “it’s a matter of preference.” Most people said printing off contact had something to do with air-dry inks. The old guy said it “causes more problems than it’s worth. To me at least.”
There ya go. =)
This photo floodlight that you are talking about, is it a professional photography equipment? I actually bought a 250W bulb and tried it on my regular lamp and it got so hot that the contact point of the bulb melted with my lamp!
Justin, you need to use an actual lamp that is designed for something for such a high voltage. That bulb is putting off a lot of heat, especially at 500w, and if you’re using one of the bulbs I’m thinking it reaches around 3200k. Look around online for an actual lamp to hold that type of bulb. If you look in the picture provided, you’ll see what I am talking about.
Justin, I am just starting to experiment with this method and am by no means an expert and have yet to actually coat my first screen….however that is what I am doing this week and have compiled all of my materials. I have been advised that those yellow portable hallogen worklights (has a sort of yellow hook shaped bar that acts as the stand and can be used to hook the lamp on to something to hang it up) that can be bought for about $20 at Canadian Tire can be used. They are 500watts and you just have to remove the glass UV filter in front of the bulb when you use it for exposing. If anyone has any experience with this or begs to differ….let me know! This is what I will be trying in the next day or so. Thanks!
I’m actually living in Singapore. Anyway I’ve been advised that the lamp should have a ceramic base to withstand the heat from such powerful bulbs. The only options I seem to have around me are professional photography studio lights that cost quite a bit.
Thanks for the help!
Well, obviously I don’t know what kind of shops are in Singapore, but maybe check some sort of hardware store (Home depot) like. They should have something there or Adorama.com or Bhphotovideo.com/. Even a quick google search will yield listings from Google Checkout, and when I was looking yesterday they had some for like 75 bucks. It’s not exactly cheap but I think it would work. I can’t really say, do some more homework and I hope it all works out for you.
Mira:
Trust me when I say buying a scoopcoater is going to save you a lot of time and money. It completely will. Learning to use it is a challenge, but you’ll be able to coat a screen like a champ when you “get it.”
Very cool tutorial for those of us who are low on the funds. There is now a web site with free plans for a 4 color T-shirt press that can be make for $125 or so. See it at http://www.printingplans.com
Also, I’ve got to agree that the scoop coater is well worth the investment…
Thank you so much for this amazing tutorial…
Your tutorial was extremely informative. I have a project in which I would like to silk screen a pattern on wood blocks. What is the best screen size for wood? Is there a special ink for wood? I would like to varnish the wood after the ink dries. Is that feasible? Any advice would be greatly appreciated.
Screen size is completely dependent upon how large the target is. If it’s a small to mid size piece, a 24×20 screen is decently large enough. You may want a larger screen just in case.
Usually, a fast-dry enamel works well on wood. Fuji Sericol Plastijet works quite well. It’ll stick to just about anything and is dry to the touch in minutes. Though, it’s best to let it dry over 24 hours, just to be sure. Use the ink with some retarder to thin it up quite a bit and be quick with the pull as it tends to air-dry rather fast.
A plastisol can stick to wood, but it has to be fully cured to stay. If you’re going to varnish the wood, this might be the cheaper way to go about it.
Screenprinting is not an exact science. =)
Wow – great post. Thanks a million for sharing – I’m off to the art shop now!
I just wanted to thank you for your tutorial. It was just what I needed to get up in running. Your instructions were very detailed and helpful. Now all I can think about is what I want to screen next. Thanks so much again!
I’m anxious to try this on my pottery. I think I finally have everything I need to get started. Is it best to use a laser printer when printing on transparency? Also, the green columns on the right are overlapping the instructions.
My husband and I are learning about silk screening and many people have recommended us buying a laser printer, is there one that you would recommend? I have designs that are 12″x12″ that would need to have 1/2 tones for fading.
shannon can you use a 150watt flood light to exposure to burn the screen. thanks for the site
[…] enough to get a Speedball kit for free. Despite reading some really great tutorials on sites like No Media Kings, I still managed to screw up a lot of screens, a lot of fabric, tons of blank t-shirts and paper […]
hi there!
i’m about to print several shirts for a few friends. i’d really appreciate suggestions on good-quality fabric ink that lasts. i have purchased a lot of speedball ink, and though it seems most people use this ink, it also sounds from this post that it might not be that awesome?
any help you could provide would be GREAT. i live in the new york area.
Speedball ink is good enough. It’ll last, maybe, 10-15 washes before it starts to come out. And by come out I mean flake off. If it’s nothing serious and just for fun, speedball ink is fine.
Could always use Permaset, that stuff is rather rad, or look into some water-based inks, they fuse really well with shirts, however are only for light colored fabrics unless you discharge the area first for a darker shirt.
hey john and jacobRyan…thanks for the replies!
they were helpful 🙂
This is great! I’m linking back to this article for my “Weekend Project” post tomorrow. Hope you get even more hits!
question for you – I know you need to use fabric ink for t shirts and such, but is it OK to use fabric ink for printing on paper? I already have some fabric ink on hand I’d like to use and it seems it would be fine if I just water it down a little so it’s the same consistency as paper ink. What do you think? Have you tried this before?
Speedball is a great all-around choice for non-serious, totally ok with it flaking off after a while, textile printing AND paper. As long as you give it ample time to dry, fabric ink is absolutely fine.
not sure if anyone is still resonding to comments here, since it was first posted in 2006(?)…
I have started printing on paper (using the stencil method) but have had strange results over and over…after printing and upon lifting the screen, the printed image has a sort of ‘bubbled’ effect. mostly around the edges of the image. I don’t know if it is the screen size (which i know NOTHING about…i just bought a ‘kit’), the ink viscosity, the ink temp, or just my stencils (hand cut of my own designs)…
any help in rectifying this annoyance is greatly appreciated!
jen
Sounds to me that there’s not enough pressure on the squeegee or stamp or whatever, but I could be wrong. Try giving it a firm pull, not a powerhouse, on some scrap paper to make sure. Just an idea.
Jen – I use the stencil method as well and after much frustration and attempts to get help from various people I finally solved my problems. Your problem sounds just like mine with the annoying bubbling and edge buildup – too much ink, too slow pull and no need to backstroke every time. I found that you need to do a quick firm pull of the squeegie and experiment with reducing how much ink you are pulling across the image. Due to the nature of a stencil (thick piece of acetate/mylar between screen and image) it collects ink more so than a photo emulsion stencil, so with multiple pulls the ink starts to collect along the stencil edges and creates quite a ridge along your image edges and may show bubbling as well. Do you have a lot of ink at the bottom end of your stencil when you peel it off the screen? Keep your ink at the top of your screen but only take enough ink with your squeegie to last through one pull that covers your image evenly from top to bottom (through inexperience I was pulling most of the ink I had on the screen over the image each time – WAY too much!). I also found I have to stand on a small step so that I get the proper downward pressure in the pull, holding the squeegie around hip height. The angle of the squeegie is important too – a 45degree works best for me, the closer to 90degrees the squeegie the less ink gets deposited, the more below 45, the more ink that gets deposited. I hope this helps!
You know I’ve gotta say, I’ve been stenciling for ages, but I’ve yet to just slap one in a screen and go; honestly never thought of it. How do you go about sticking the acetate or mylar down to the screen so it doesn’t move or anything?
You can try cutting the stencil out of macktack– that plastic sticky sheet stuff. You don’t get too many pulls though before it starts to come un-stuck. Maybe about a dozen.
oh thank you guys so much! millu, that sounds exactly like what is going on! great tips…i NEVER thought i’d get this straightend out. you guys are so awesome to help!
jen
how do you make the halftone in the picture?can you tell me .. how?
Actually designing the halftone is a little tricky, but incredibly doable. Illustrator and Corel both are able to do them correctly.
http://www.google.com/search?hl=en&q=halftone+tutorial&btnG=Google+Search&aq=f&oq=
Go nuts.
Getting the halftone to print onto the transparency correctly is the hard part. Typically, the “professional” way is to use a raster image processor (RIP) program. It takes all the hard work and spits the separations onto the medium. The downside to this is that the RIP’s cost is incredibly expensive. Look up “fastRIP” or “fastfilms.” In a nutshell, the RIP separates the colors into b&w, deals with the halftones, and sends it to the printer.
Another downside is most RIP programs only work on specific, mid to high-grade printers on vellum or transparent glossy film. Inkjet mostly. A laser printer CAN do it on a sheet of vellum, but the odds of getting a dark enough black to burn is unlikely. IE: a chance of using a lot of toner for one print.
The cheap (aka free) way of printing a halftone is researching halftones, screen angles, dot patterns, and the like and trying it in Photoshop.
If you really, really want it done the right way, take it to a screen shop and ask them to do it. It’ll be done correctly the first time. It shouldn’t run more than $10 per film. They may even include the printout in a “coat/burn/prep” package or something similar.
I’d say just fiddle around with Illustrator/Corel and PS for a while to figure it out. Just a suggestion.
What exactly does flooding your screen with ink mean?
I realize I need to apply the ink on the screen between each print, but does flooding it mean using the spatula and applying a thin line then the squeegee making a coat over the image ?
If I use the squeegee on the screen between each print won’t that mess up the printing onto the surface ?
Flooding is just pulling the squeegee across the image, filling it with ink before doing an actual pull. I think what I just wrote doesn’t make any sense at all. =/
As for the surface, it shouldn’t. Not to say it won’t, but shouldn’t.
so i guess this is how people get their clothing line started??? well cool
[…] No Media Kings […]
Wow that is such a cool post. I love that you provided pictures of the whole step too, thanks!
Wow, thankyou for a great, clear step by step. One thing I would like to see, is how you use the acetate for the second colours. I would like to know more about registration techniques.
Would anybody have any ideas on screen-printing on ceramic? What mesh count to use? What to mix the ink/enamel with? I’m researching for a friends degree show and I would really appreciate some advice.
Thanks.
I am having trouble with my painters tape removing the set emulsion from my screen. What am I doing wrong? Thanks for your help.
Masking tape (paper), when it gets hot or you leave it on for a long time, can and will pull off just about anything it’s been touching when you remove it. It’ll leave this sticky as hell residue as well. Just use regular packing tape (brown/clear).
Maybe this doesn’t explain it. I dunno.
OMG, I’m planning on using a screen that I made 29 years ago. It appears that the emulsion has held up.
I’ll let you know how it goes.
Thank you so much for the brilliant tutorial! I’ve been wanting to try this for years and your tutorial is just what I needed to give me the confidence to try. On a different note, I have to say you gave me an asthma attack with your BVM!!! I laughed so hard (mine was identical, only green) I had to resort to me puffer! Sadly, my BVM is long gone, but hilariously, I know where to get another one. LOLOLOLOLOLOLOLOL!!! ;-D
I’m having a hard time finding a large sheet of acetate. I can only find transparancy size sheets (8.5×11) and nothing close to 2ftx2ft and if so how much should it cost and is it possible to buy only one sheet at a time. also after a registration is made you can just wash the sheet right?
would an alternative just tape a bunch of transparancies together?
where can i find a sheet in torrance, ca?
thanks
btw i liked the tutorial by far the best
Kwat, you can purchase large sheets of acetate from http://www.DickBlick.com just search acetate in the search bar on the website. You can buy them individually from them online.
Well..the emulsion did hold up and I was able to print from this screen, although the screen tension was a bit loose so I ended up remaking the screen and recreated the artwork by scanning the old screen and touching it up in Photoshop.
Kwat – you can get large sheets of plexiglass at Lowes or Depot and draw images on them or trace them on from a page. Granted they are thicker than acetate so the image should be on the bottom of the sheet not the top, if that makes since, so that when you burn the image there is no shadow. Also that means that any thing with words or really just anything should be done in a negetive fashion…..
and remember, sweetzombiejesus loves you.
It is great to see this do it yourself approach to screen printing T-shirts. I love the use of a squeegee for coating the screens! This is exactly how some of the most successful screen printers started out. Great post.
[…] goldmine) is silk screening onto old skirts, skirts, and choice undergarments. Check out this great tutorial (sorry, no undergarments pictured, […]
Hi, Can someone explain to me how to perform a shadow effect on t-shirt. My image is a tennis ball bouncing on ground leaving it’s shadow.
Charlie you’d probably want to create the shadow in a halftone and screen it that way. http://www.photoshopsupport.com/tutorials/cb/halftone.html this is just a reference link to give you an idea or this one http://stencil-dart.deviantart.com/art/Half-Tone-Tutorial-74787927 either should give you an idea.
I will try your suggestion,
Thank you
Thanks for the great guide! Went through the process of burning a screen and printing t-shirts today, which I haven’t done for years. Your instructions really helped!
Hi everyone,
I just found another resource that looks pretty good so far that provides basic information about screen printing and tutorials:
http://www.silkscreentutorials.com
The pictures are pretty good.
Shannon ( or whoever else might be of greatly appreciated service),
I have been making shirts for quite a while and have had a lot of success doing so – for the most part, that is. I occasionally experience the same problem other writers have had with regard to washing out an image after burning and the emulsion become gooey again and starts to wash out completey (even in areas that have not been blocked). I have recently been using smaller frames to print labels after about 10 minutes of exposure and have not had much success. Please help (anyone). Similar questions have not been answered.
I should have mentioned before that I allow at least 24 hours of drying after the intial application of the emulsion to the screen…what could be te cause of the aforementioned problem?
Peter — are you moving the bulb closer to the screen for the smaller screens? I’ve found that big t-shirt screens do better at about a foot and a half, but when doing smaller screens for stickers (or whatever) the bulb works best about 10 in.’s to a foot away. With a 150 watt incandescent bulb, that is. Also, I tired of printing my band stickers one at a time on a small screen, so I used a 16×18 screen and burned the image onto it 16 times, I buy big sheets of sticker stock at a local art supply, print them, and use an old time paper cutter that I got years ago at the thrift store and just cut them up. Save lots of hours and dollars. Cheers. “Mr. Order, he sets a very quick pace, but Old Mother Chaos is winning the race!”
Sweet Zombie,
You were right. I re-printed today and everything worked out because I held my photoflood closer than I would had it been a larger screen. I also burned for a full 20 minutes instead of cutting the time in half (which I thought I had to do because I was working with a smaller screen area). Also, it’s funny that you mentioned stickers because I was thinking of doing it the way you did it at first but now i know there is a more practical solution (buying the roll of sticker paper).. Btw, where do you purchase it?
Keep printing,
Pete
I heard that there is ink that don’t need oven to dry, it just dry in the reg room temp… any idea where can i find that?
Peter — I live in Kansas City (go chiefs) and buy it at Coldsnow Art Supplies, no idea if they’re national but I don’t think so. I know we live in a wired world but you really can’t beat breakin out the ole yellow pages and just start calling art supply stores. I’m sure that you can find it online as well, but I occasionally enjoy interacting with warm humans. Good Luck, as the chinese say.
Have burned 2 screens. The designs looked great after I sprayed the emulsion out and then after a few minutes there are bubbles or blisters in a couple of places on the screen and then peals off. What’s the problem?
Meco, there’s this stuff called aerotex made by union inks. Works decent enough. Upside, you don’t need a dryer. Downside is that right after you add the catalyst, what makes it air dry, it starts to dry right there. So, it’s possible you could accidentally ruin a screen by forgetting to be quick and clean it out.
http://www.dickblick.com/categories/screenprintinginks/
Personally, I tend to use Naz-Dar for big projects (like screening a banner or poster), Aerotex (for shirts etc), and Speedball if really don’t care about it washing out. All of these are air dry.
There’s also the option of using a regular plastisol in conjunction with a heat gun. A bathroom hair dryer WILL NOT WORK. You can buy one for under twenty dollars at any chain hardware store. It doesn’t have to pump out six million degrees, at the min 300-350°F.
http://www.homedepot.com/webapp/wcs/stores/servlet/ProductDisplay?storeId=10051&langId=-1&catalogId=10053&productId=100371401
JP, after you wash out the screen, put it out in the sun for a bit. That should stop the problem. If it doesn’t, try cleaning the screen and re-coating/burning.
[…] want to learn to screenprint? These are a few of the resources I used and found extremely handy. · Silk Screen Printing Instructions – a copy of the manual that comes with Speedball Printing Kits · Screen Printing – Cheap, Dirty, and At Home · How to Silkscreen Posters and Shirts […]
Hi,
Great tutorial! I was wondering, are the 250 watt photoflood bulbs the same as any 250 watt incandescent or halogen bulb? Or are they different?
Molly – different. Photoflood bulbs are more expensive but work faster. Regular old 150 watt bulbs are $2-3 but they take about an hour and a half. One time I tried to use a 300 watt incandescent bulb and it was so bright that it wouldn’t allow my image to set b/c it actually shone through the blacked out negative. The moral of this story is only use 150w incandescent or 250w photo. Remember, sweetzombiejesus loves you!
I want to burn an All Over screen 42″ x 48″ what would you guys suggest being the best way to go about this?
Sweet Zombie,
Do you have any idea where I can get the sticker stock in rolls online? I know you already mentioned doing it the old fashioned way, but I thought it couldn’t hurt to ask if you know what exactly to look for (what should I google?).
Keep printing,
Pete
Where can I get large prints on transparency paper? I’ve only been able to get regular sized paper prints. I need to make a bigger design but can’t find a place that prints them. Any ideas?
Miguel,
USing acetate is pretty much the same as using larger sized transparency paper. It comes in rolls of all sizes and can be ordered from dick blick’s online website. From there, you just have to figure out how you are going to transfer your drawing on to the acetate. Are you going to a copy center like Kinko’s or Staple’s or are you going to directly draw on the acetate? Let me know.
Keep printing,
Pete
how to use sensitizer powder???
the orange sensitizer powder
[…] first one I looked at from No Media Kings requires the use of a professional aluminum screen. She talks about where to get the screen in […]
in photo emulsion.how about if i expose it under the sunlight. i think it is possible also. because we tried it already, but the results are not the same. maybe mixture and exposing duration are the problems. in my experience of exposing the stencil under the sunlight we are only counting maximum 20 seconds.can you give me any ideas about this process because even if i used to do this kind of process i am not sure of the results. thanks best regards
This is the BEST silk screen tutorial I’ve found on the entire internet!! THANK YOU for your thoroughness and handy pictures!!
I HAVE ONE QUESTION.
—————————————
CAN I USE SUNLIGHT TO EXPOSE MY SCREEN, AND IF SO, IS THERE ANYTHING EXTRA/DIFFERENT I NEED TO DO? (You said you kept your silk screen in the darkroom when exposing, so is using sunlight even possible??)
Thanks to anyone who answers!
Sarah, yes you can use the sun to expose screens. It’s a great big pain to trial-and-error, but it’s a very viable solution to not having a lightbox.
In a nutshell, from what I’ve read/heard, tape the positive to the backside (totally flat side) of the screen and put your screen on a black blanket/shirt/cardboard face up. If it’s super sunny, expose about 30 seconds, a minute or more if it’s cloudy. It’s a huge trial and error thing, but I’ve heard people have outstanding results.
And sunlight is free. Yay!
Also, be quick about it. Don’t keep the screen in the open until you’re absolutely sure it’s time to expose; keep it in a black garbage bag until. The emulsion may set prematurely and might not wash out easily or at all.
I need HELP! I’m hoping to screen print some fine art prints but I can’t figure out what paper to use, like, what specs does it have to be?
Vellum (laser printer or inkjet or whatever) or plastic transparency (inkjet). You can get vellum in 50-sheet pads at Office Depot for around ten USD.
http://www.officedepot.com/a/products/434159/Staedtler-Plain-Vellum-Paper-8-1/
Your directions are so much help, I’m so happy that I found this because my step father has been aching to dabbing in screen printing. I really didnt want to buy the $2,000 silk screen sets; this is such a less expensive and easier way to do it! Thank you very much.
Sorry I mean what paper do i use for actually printing onto. Am i right in thinking I cant use any old paper because it will ripple as soon as ink is applied?
Zak, check http://www.dickblick.com/categories/printmaking/ I believe that may be what you’re looking for.
Whoops sorry for the double, http://www.dickblick.com/categories/printmakingpapers/ that’s the link you want.
Awesome! Thanks Jacob
Thanks! these instructions are great and easy to read with the added help of images. As an art teacher this is very helpful when explaining to the learners how to screen print using photo emulsion.
Thanks a bunch!! I thnk you pretty much explained it in a nutshell. Very precise and to the point! : )
Another place besides American Apparel for plain white t’s is ebay.
How do you get oil based paint out of your screen? We tried alcohol and it ate the emulsion right up. very frustrated!!!!! 🙁
I don’t know if anyone responds to this anymore, but I figured it was worth a shot. 🙂
All my T-shirt prints are either barely visible, or bleed through to the inside of the shirt.
I’m using Speedball’s Plastisol inks (Not the best, I know, but it’s what I have access to) and a screen of the proper mesh count. Does the problem arise from the amount of ink I’m flooding the screen with, the fact that I’m using a hard squeegee, or something else?
barely visible is not enough pressure, bleed through is too much. do a couple test runs on throwaway shirts before you get into it. you generally want a firm/hard squeegee when doing plastisol.
Thank you! 😀
stick a piece of cardboard or wood inside the shirt to prevent that bleeding through.
Wow this is a great article. I have seen a few youtube videos that are top notch but this is great. What made this article excellent was the pictures. I think you always need pictures to know what you are trying to explain. If anyone want to check out more guides on silks screening, including videos, check this site out.
http://www.howtosilkscreen.info
Great Post!
hello Shannon, I have a question. how would one make a screen of a photo realistic picture? I’ve used the halftone method but the image never comes out clear. The diffusion dither effect looks great, but I don’t know if the image will come out on the screen. what do you suggest?
p.s. love ur artwork 🙂
I was wondering if anyone can tell me the following: When using Diazo photo emulsion, as pictured in this blog, how long should the screen be exposed for under the 250 watt lamp, and how far in distance should the lamp be suspended from the screen when exposing? Any help would be greatly appreciated, thanks!
I am new to screen printing and have a question. I have successfully burned screens, printed, and reclaimed screens. Where I am having an issue is taking a used screen and removing the ink but leaving emulsion and pattern.
I want to use the same screen with the same pattern for a few days and a few different print jobs. I have not been able to successfully clean the screen to remove the ink without destroying the pattern and in turn; needing to reburn a screen.
Could someone tell me how to remove the ink from a screen but leave the emulsion?
@ Chris
If you’re using plastisol ink, it’s very safe to just leave the ink in the screen. It’s not going to dry out. OR, if you _need_ the ink to come out, do this:
Go down to any paint or hardware store and ask if they have LACQUER THINNER. Price ranges anywhere from $5 USD to 50. You want the cheapest stuff they have, it’s all the same.
When you get done with the project at hand, scrape as much of the ink out of the screen as you can then take a couple paper towels soaked in the stuff above. Ink comes right out. Be sure to use a kitchen glove as it’ll get VERY messy. Don’t rub the screen, though. It can (and will if you rub) strip the emulsion right off, in turn, making you start over from scratch.
If you’re using water-based, most screen supply places carry this stuff called BETTER THAN WATER. Or just use plain water. The ink should “dissolve” and come right out.
yay 😀
Also, if you have more than one image on the screen, there’s tape over it, and you need to get to it next. wait until the lacquer thinner dries (a minute at most) before peeling the tape off. The sticky on the tape does something with the thinner and can pull the emulsion with it.
ANSWERING Lia’s question!!!! It depends on the size of the image that you are burning,and the type of bulb.for example,for a 150 watt flood bulb: 8×10 image, bulb 12″ away from screen, burn for 45 min, (10×14 12″ 45min) (12×18 15″ 74min) (16×20 17″ 92min) (18×20 17″ 92min)
I hope this helps, any other questions e-mail them to, (zenone_74@msn.com)
where can I get Large transparencies printed???? like 18×24.
where can I get Large transparencies printed???? like 18×24. zenone_74@msn.com
A 250 watt flood bulb will work fine 18 inches away for about 10 minutes. Less time if it’s incredibly detailed. It’s also possible to use the sun and you don’t have to leave it out there for any longer than thirty seconds.
yeah but why do you need to use rubber spatula
you don’t HAVE to use one, it’s just the cheapest. hell, you can use a paint stirring stick. those are free.
Thanks for the answers above!
I am having trouble removing the emulsion from my screen! I used Diazo Photoemulsion for non water based inks. Part of the emulsion was over exposed, and now will not come off! I used bleach and the hose many times but still have faded blotches on the screen! Is there anything else I can use to clean it? Thanks
thank you for writing about silkscreening on fabric n paper.
Before I embark on this paper project, are there any limitations to the size of font that silkscreening can do? Let’s say, if I did a business card with a
3″x 4″ card, would a font with a point 10 work?I would appreciate ur comments.
Louie, that’s going to depend on the mesh count of your screen. But for your project since it’s on paper, I’d go with around a 200 mesh.
if we are using rexalpha conductive silver ink for screen printing RFID antenna, with what solution we need to clean the ink after screen printing.
HOW DO I PREVENT THE INK FROM BLEEDING THRU THE INSIDE OF THE SHIRT, OR IS THAT NORMAL
Helen, stick a piece of wood or cardboard inside the shirt. It could also be the weight or force of your pull. Try to keep the squeegee upright and firm not a powerhouse.
Question:
I have almost a full batch of photoemulsion that has expired and is just sitting in a jar. How/where should I dispose of this so that its least harmful to the environment and my home?
Thank you so much. I needed the acetate part really bad. I could not get my designs in the right place no matter what I did.
Great resource! I was just wondering where you got those hinges from.. I’ve been looking for them everywhere! Maybe I’m not looking in the right places??
Grace, visit http://www.dickblick.com/itemgroups-h/hingeclamps/ they have a few different types to choose from.
Do you have any tips on cleaning emulsion off the screen after everything is printed (so that I can use it with another design in the future)? I heard that you can use a bleach+water combination to scrub it off….
Yifan, bleach will work, but this is the stuff you want:
http://www.dickblick.com/products/ulano-stencil-remover-no-4
Wet the screen, apply this stuff from a spray bottle, let it sit for a minute or two, blast it off with a pressure washer or thumb over the hose.
also, DO NOT let it dry as it will harden the emulsion and make it permanent. 😀
Hi
I live 8 hours north of Toronto, do you know where I can get silk screening supplies online store in Canada?
Thanks
Hi silkscreeners, just a quick note to plug Shannon (the woman who wrote this sweet tutorial) and my (the guy who runs No Media Kings) new graphic novel, Sword of My Mouth:
http://nomediakings.org/sword/
We’re launching it in Toronto on Thursday and in Detroit (where it’s set) next week.
I have been silkscreening using Diazo photoemulsion, but when I went to reclaim the screen, was unable to remove all of the photoemulsion using bleach and a hose. I even purchased highly concentrated screen cleaner and was unable to remove every last bit of the emulsion. I now have two silkscreens both with small amounts of emulsion that will not come off. . . anyone have any tips to get the screens clean? (Next time I will not expose them for as long, hopefully with better results.)
Lia, I used a screen cleaner, wet down the screen, let the chemical sit for about 30-ish seconds depending on the concentration of the solution, and I used an attachment to my hose that turns it into a pressure washer. I wouldn’t worry about getting any of the emulsion off within the first inch or two of the screen frame, as the tension is too tight there anyways. Also a bit of elbow grease/scrubbing might help loosen it up after you apply the chemical.
One of the handiest tools is a made from washing machine hose. Just cut off one end, go to the hardware store and buy a male fitting, and then attach a standard nozzle sprayer. With lukewarm water only, it will process screens beautifully once they’ve been burned and it also cleans up water base inks quickly. I also use it for rinsing screens after I have degreased them. Another handy tool is a screen installation tool, also from the hardware store. If you see the cord coming out of the frame, this little gadget (about $5) will put it right back in place.
This is such a great article!
I’ve installed the same clamps recently but I’ve noticed that the construction leaves space unevenly between the table and the screen. Does anyone have advice on how they managed to make the construction work?
At a workshop I’ve seen those bigger clamps that allow you to lower the clamp towards the table, but I haven’t managed to find them anywhere yet.
Anyways, great tutorial!
Thanks for this great tutorial! I refer people to it all the time so I just linked you to our blog and fb page at Otis College so we can share the goodness. All those little details you provide are really key to making the process smoother and getting a good print.
Hey guys! Shannon Gerard, the writer of this tutorial, is touring the west coast through August. Starting in California and heading up to Vancouver, she’s hoping to do little talks on her unique drawing process, sell some original art and some of her ribald and topical crafts, and she’s open to doing workshops to share her bookmaking and silkscreening skills. If you’d like her to come to your town and you can put her up, or show her around, or help organize an event, email her at shannon@shannongerard.org .
If you don’t want 2 spend money on a transparancy you can use standard prints with baby oil on them. It makes the image transparent and works great. Make sure you don’t use photo paper, just normal paper like in copy machines
Thanks for the great tutorial. I used to silkscreen back in the day but never made screens at home. Now I don’t have money for studio time and your tutorial has helped me immensely.
One question though, I’ve just always used the same squeegee for everything. Apparently this is not the way to go. Could someone point out what kind of squeegees I should use for different images/materials? I would greatly appreciate it.
Someone asked about finding inexpensive t-shirts to print on. The major hobby store chains frequently run specials on their in stock t-shirts. I’ve seen them at least $3 a shirt on sale and check the weekly ads for specials. I stock up until the next sale, usually every 5 to 6 weeks.
What’s the word on washing out screens in your bathtub? I’m worried about the chemicals that I would need to use to remove the emulsion once I’m finished. Is this a bad idea? I suppose I could scrub down the tub extremely well each time. She didn’t really address this in her tutorial (although I found that it covered pretty much everything else). I can’t use the hose outside because of runoff issues and my landlords live on site.
ALSO – anyone have any luck with using a removable shower head attachement to wash out the screens? is the pressure adequate? thanks!
Shannon, or anyone else that can answer this, I’m looking for some advice on a project my design group at school is working on. We’re going to be doing live screenprinting on t-shirts during an event and came up with the idea to use old tshirts to print on instead of buying new ones. In other words, we have shirts with an existing design and we’re going to be screenprinting on top of that design. Right now the shirts are dark blue and have yellow text across the front so for our screenprint design we are going to design something that covers up the text, but if we use a light ink I’m worried that the old text will still show through. Do you have any tips for printing on shirts with a preexisting design on them?
Allison Shiman
Allison, you’re going to want to use a supercover ink, look into Permaset. It’s a plastisol ink so make sure your emulsion can stand up to that (most standard emulsions can, it’s water base you usually have to worry about) it’s a thicker ink so adding a Chino for soft hand may be a good idea.
Hi. Does anyone know the procedure on printing large scale images? Where can I get an image printed on transparent paper that’s larger than the standard sizes? Is there alternatives to burn the image without using transparent paper?
I’m a fine artist currently working on a project for a show.
Appreciate your help on this…
Shawn, I just print them off in sectors, giving them a 1/2″ to 1″ overlap and just tape them together.
shawn Says: January 12th, 2011 at 12:37 pm
Hi. Does anyone know the procedure on printing large scale images? Where can I get an image printed on transparent paper that’s larger than the standard sizes? Is there alternatives to burn the image without using transparent paper?
I’m a fine artist currently working on a project for a show.
You can use :
example: standard print you can use xerox enlarger so that it will be in larger image,. and after the large image is print in large paper /bond paper is not transparent you may put oil to make it transparent and use it in burning you silk screen process… ^_^V!!
i usually make my negative image (image printed in substance 16 bond paper and i put oil to make it transparent) i use the SUN in burning process in 5sec. to 8sec…
[…] whew! If you’re interested, check out this awesome book by my friend John Isaacson and this handy website for all the info you need. I simply adore silkscreening […]
This is the easiest and best tutorial I’ve seen on the web, and I’ve looked at a lot. You showed pictures of exactly what you needed to get the point across, and I love the acetate part of the process–I’ve never seen that before and will definitely try it. Thank you!
I have a couple silkscreen posters that are hanging on my wall, this post was the reason why.
I could see the image on the silk screen after washing out with the garden hose but….it faded away the next day! Please advise
is it ok to discharge print with water base silkscreen on a prepared for dye shirt?
is a prepared for dye shirt the same as a reative dyed shirt ?
Yes non textile ink can wash out.
Hi, I am have a problem applying water based blister or heat seal varnish to paperboard. I am using a 61 mesh count screen. I am getting an eggshell finish with the print. Can anyone offer some advice.
Hello ive burnt the image into my screen and for some reason it dosent print anything ?? I washed it after burning it and im wondering if i waited too long before washing it ?? Is there any way to still use this screen or do i have to start all over??
HELP….Sgined Robert!
Robert, letting it sit after you burn it really won’t hurt it but exposing it to the UV rays for too long will cause it to harden in the screen like the rest of the screen. My best advice is to start over. This time do a time test. I just made a transparency that said the word “TEST” a bunch of times. And you start off with all the words except one “TEST” being covered, and turn on the light. In 1 or 2 minutes, uncover another, wait a couple minutes, uncover another, wait a couple minutes, etc. What that will do is by the time you finish your first one that started uncovered will be the longest, and the last the shortest. You then wash it out. Some will wash completely out and you know the exposure wasn’t long enough. Others however will just wash out the word test and it’s up to you to then examine it and decide which is your happy medium.
Great tutorial! It convinced me to take the silkscreen plunge. Now I’m a happy silkscreening artist. Thanks, Shannon!
Thanks that was a great tutorial. You might of just saved me about $900 in supplies and to me your tutorial is priceless.I was just about to buy a machine That I probably won’t need right away…Now I can see if people will buy my shirts first. lol
Thanks again
Gord
Thank you so much for this awesome tutorial! Helped me a ton!!!!!
Jess
I am so happy I stumbled onto your page… I did a bit of silk screening in college and wanted to start it up again, but I couldn’t for the life of me figure out what kind of plastic (the acetate/vellum) to use. All the other sites were going on about “oh, you just have a four-screen printer and register them all”… definitely not something my wallet was up to.
I would like to silk screen retouched photos (sepia) onto glass and have run into a few problems.(I’m still in the theory stages only)
1. Can I get glass enamel through a silk screen.( What would be a reasonable viscosity to try, ie if it was custard how runny?)
2. What mesh would be considered a good place to start.180-235?
3. Glass is definitely non porous so would it smudge when you lift the screen
4. Should I be looking at a different method to transfer a photo image to glass. (It must be fired enamel not plastic stick-on)
hi
we are prinitng plain white colour in dark colour fabric after 3hours dry, we transfer mirror image print from paper to fabric. But the registration gets off.
kindly give solution to get correct registration.
Regards
B.Satheesh Kumar
I’m so happy to have found this tutorial again!! It’s the one I used when I first started screenprinting many years ago (probably around 2006? 🙂
I just screenprinted for a while, then stopped, now I want to go back to doing it (but I have to re-learn the whole process, I forgot it all… and also I want to learn more than what I was doing back then) – so happy to have found the old school tutorial here again, after so many years! Thanks a lot for sharing this great resource!
[…] how to silkscreen posters and shirts […]
You can find great supplies at http://www.sgaimaging.com
[…] Przegl?d ró?nych metod druku tutajLinki z instrukcjamiCraft Chimotylek cz.1 i cz.2FeltcafePrinting on Fabric with Bubble Jett-shirt1t-shirt2crublyi jeszcze jedna koszulkakrowa ch?opiec […]
I haven’t washed my screen right away after heating it. The parts that should be removed hardened. Please help. What should I do?
You’re going to need to go through the process of reclaiming the screen using a screen cleaner. Check out a screen printing supplier to purchase some. You’ll then have to go through the process of coating the screen with emulsion and burning the screen again. Make sure you wash it out as soon as you’re done burning or at least return it to a completely light proof area.
Great post and very good job of explaining things.
I definitely know your pain when working in a windowless bathroom with a photosafe light!
[…] How to silkscreen posters and shirts » no media kingsHow to silkscreen posters and shirts » no media kings […]
Dear,
If I use fluorescence lamp, how long to expose the screen?
[…] some day on how to screen print, but here are some recourses for those of who want to learn more: This one for photo emolusion (which I use) and this one for a more lo-tech emulsion approacah. […]
Awesome post! This was a very knowledgeable article. Thanks for sharing a very detailed techniques and instruction with screen printing. Looking forward for more!
Bruce, https://www.printavo.com
How do I make transparencies of ART inch lipwork that’s 16″ by 16″ when my printer can only copy 8X11 size sheets and the art work will not sit flush to the glass because it has a 1/8th lip all around.
This is such a great overview of screen printing, and a year later after reading this I have started my own poster art shop at http://www.shaferprintshop.com. I wanted to come back and comment as this was one of the articles I first read when researching my new business venture. There is not much out there when it comes to screen printing poster art so I really appreciate your work on this article!
[…] the Design: The exposure unit plays a key role in ensuring proper image exposure. It evenly exposes the screen to light, allowing […]